OtoCo always wanted to raise early funds from its users and followers in the most transparent and democratic way, without VC-type preferential treatment or backroom discounts.
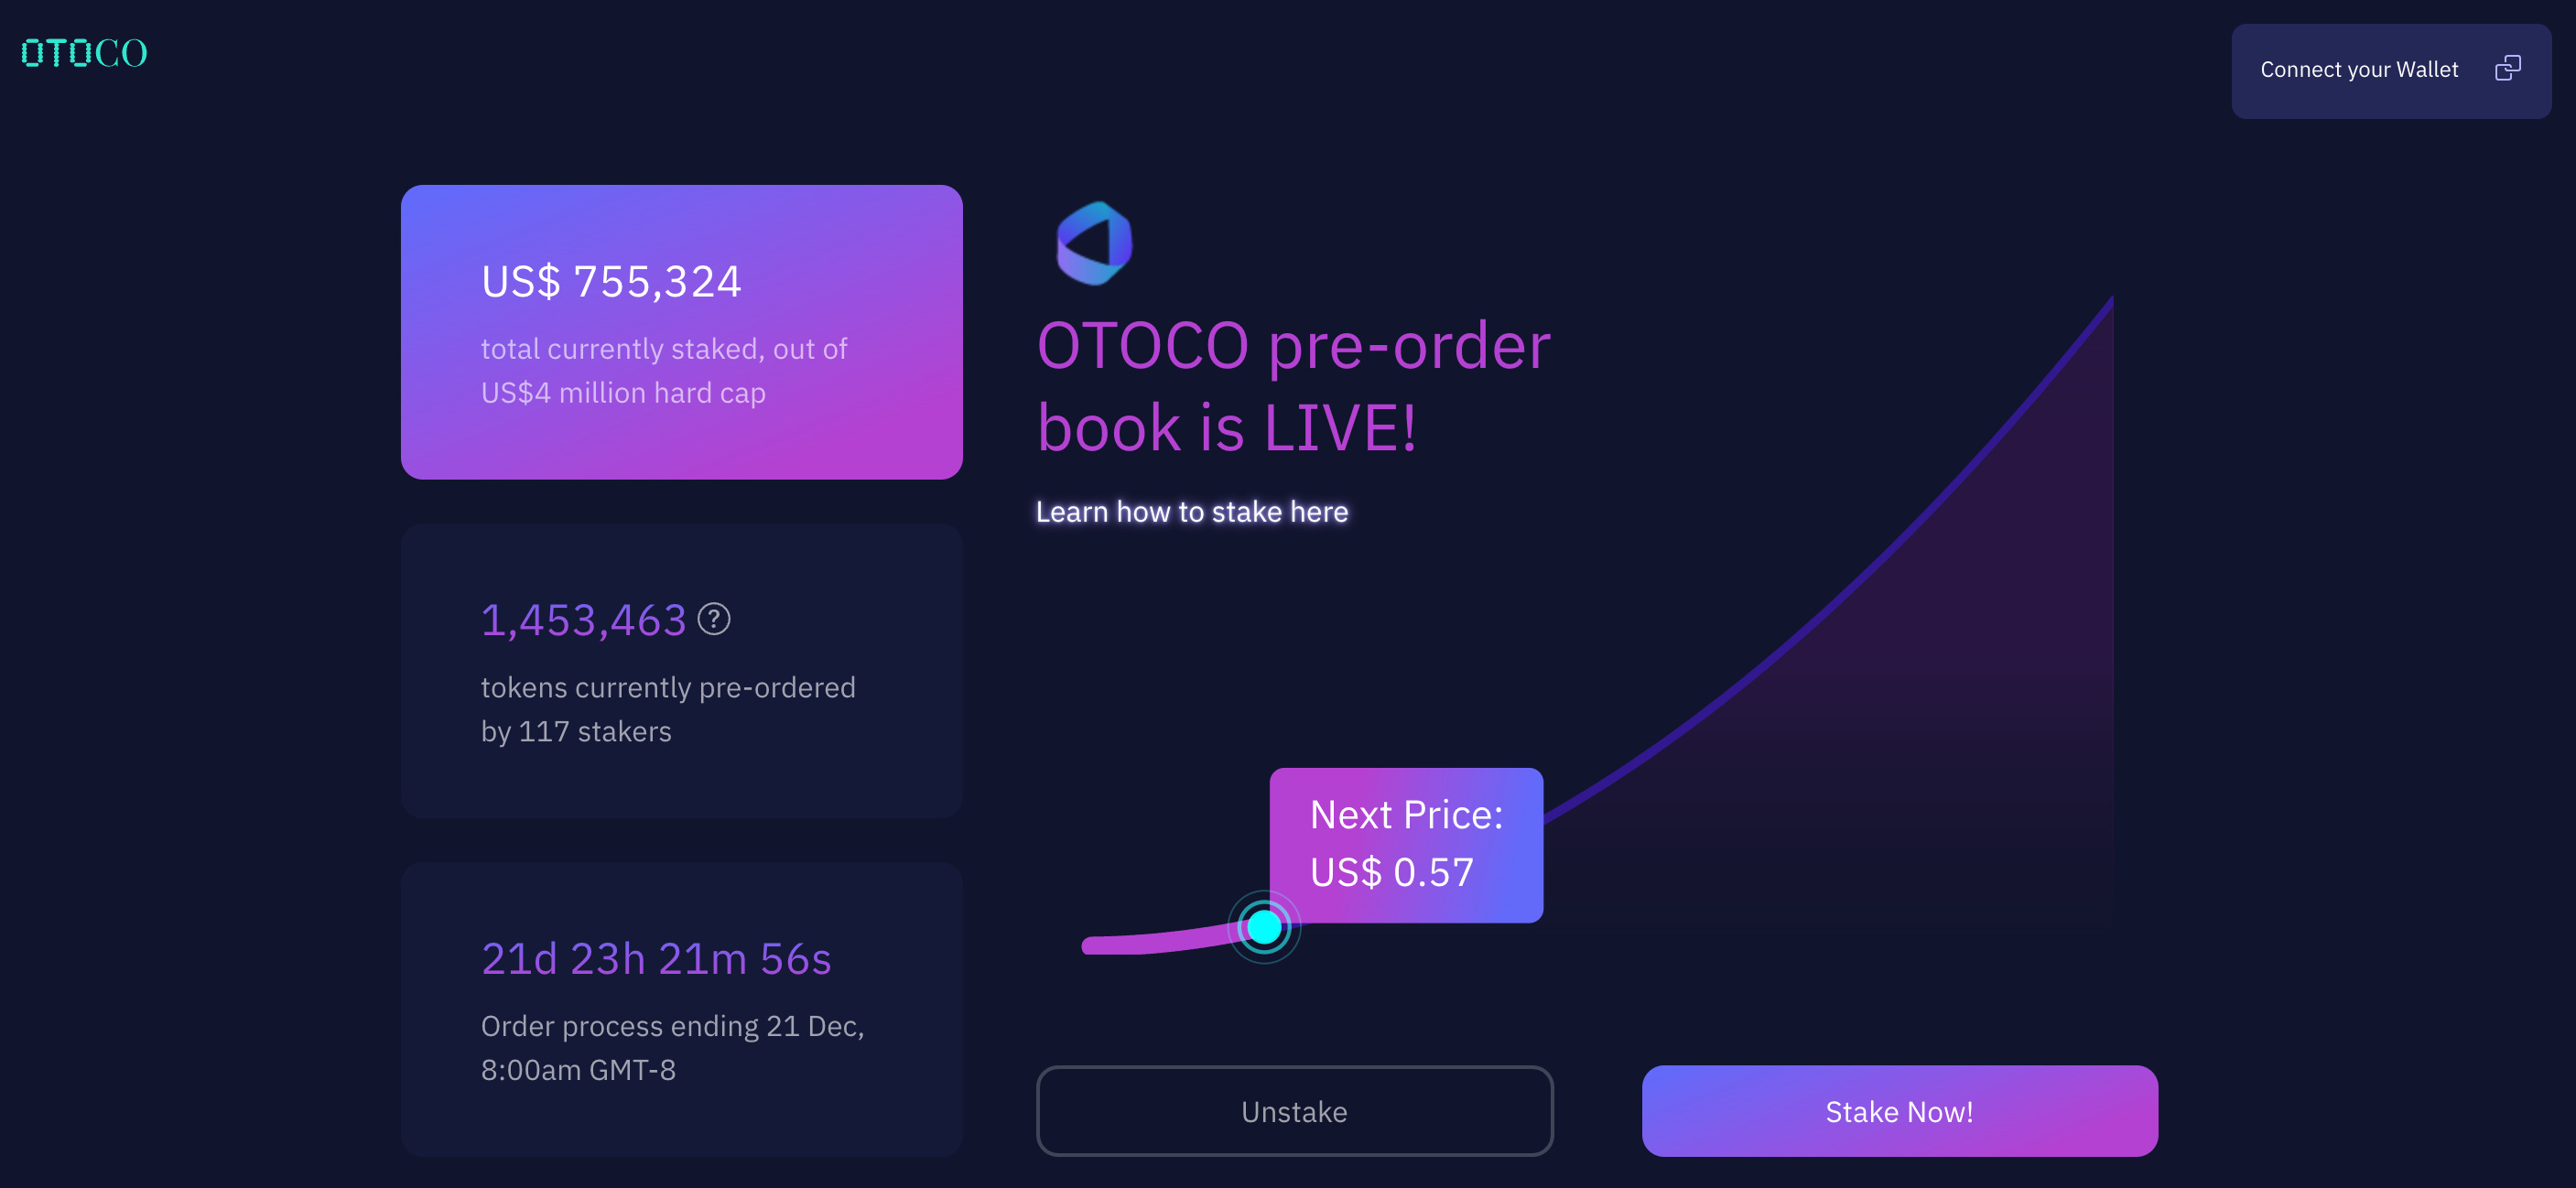
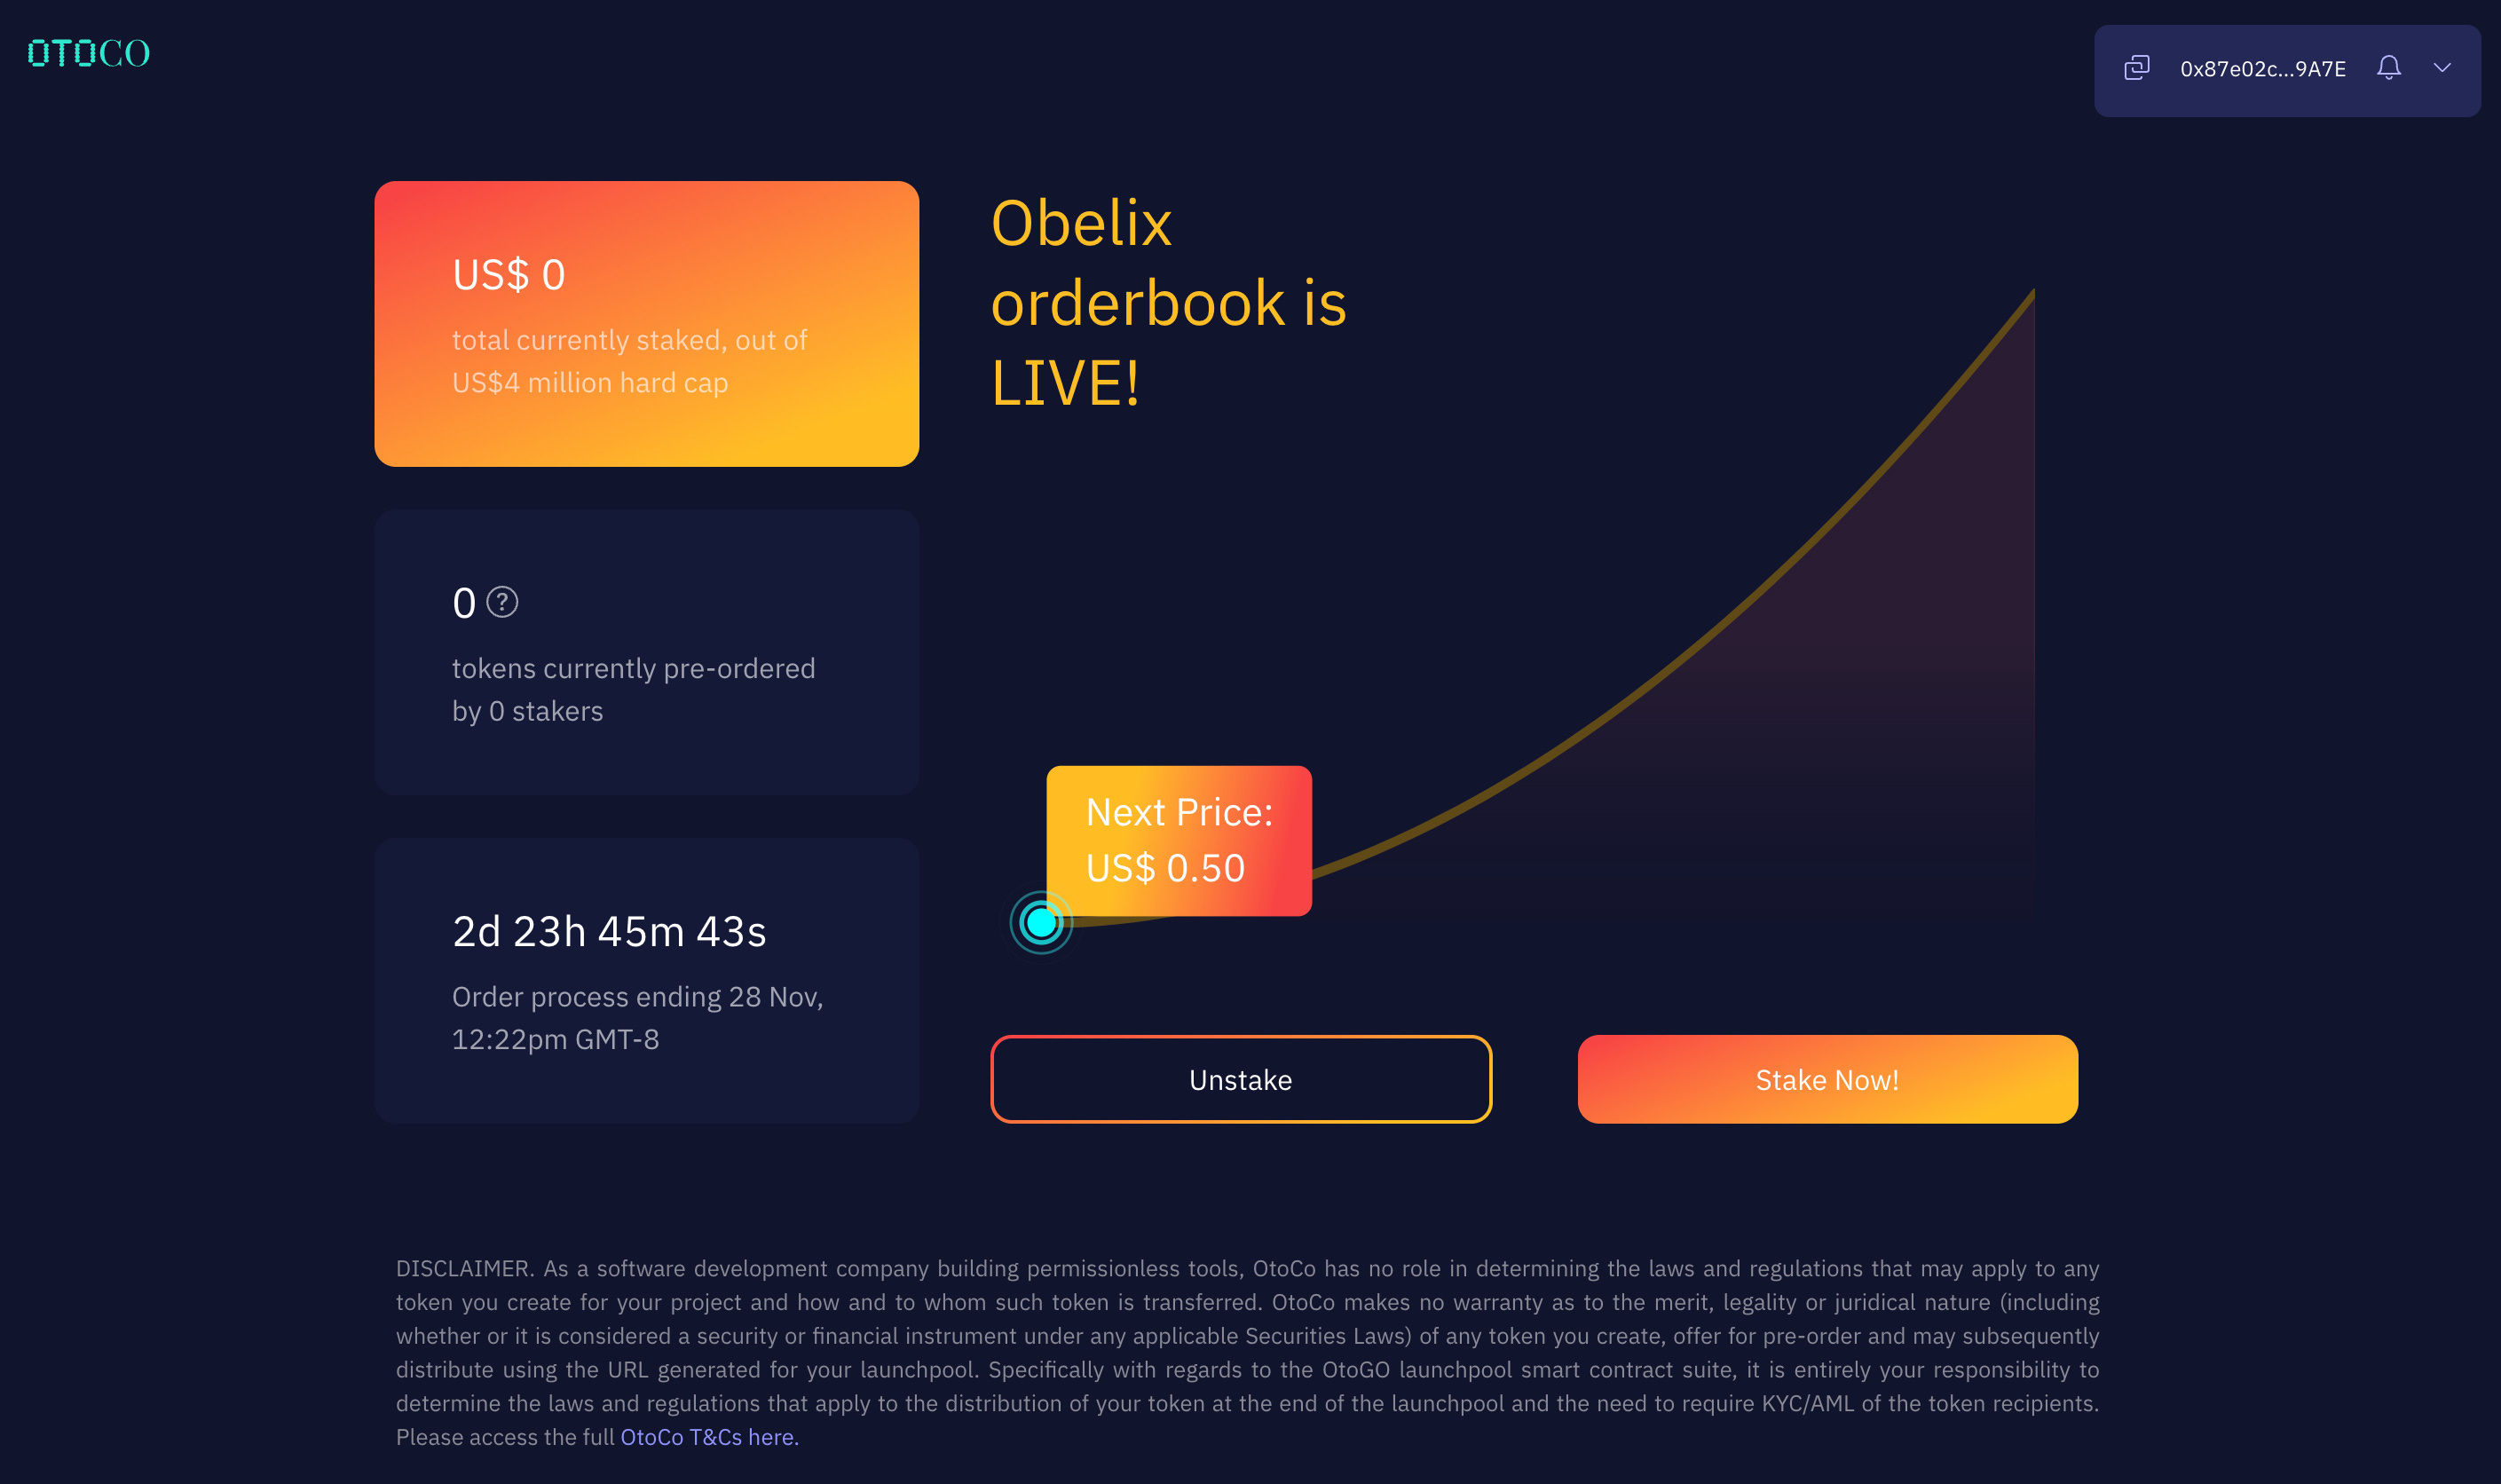
With this in mind, we started building a suite of launchpool smart contracts we reported on earlier, and over the last weeks, we used this to let our community pre-order our OTOCO token, using an algorithmic price-setting under a bonding curve, visible and accessible to all who want to stake the project with up to US$200,000 per staker.
The OtoCo launchpool is soon set to close and so far almost 1.5 million OTOCO tokens have been reserved. You can still reserve your OTOCO tokens here up to 8 a.m. Pacific Time (GMT- 8) on Dec 21st.
No offense
More than the actual number raised, we’re encouraged by the feedback from users who asked if we would make our launchpool solution available so they can raise early funds the same way.
When compared to other ways of raising early funds, we believe OtoGO represents a sea change by making the process entirely onchain and permissionless, without offending regulators.
With OtoGO anybody who spins up an LLC or DAO on OtoCo can parameter their launchpool, upload their logo, select a matching color scheme and invite their community to stake their project via an OtoGO-generated Web3 URL.
The model is perhaps best compared to Tesla taking refundable pre-orders for its model 3 when it was yet to be launched, which at the time didn’t seem to provoke any regulators.
OtoGO goes a step further and engineered the staking process such that a launchpool sponsor cannot claim the monies from pre-orders until the end of the Staking Stage (see below).
This means that no money changes hands, in contrast with for instance a Simple Agreement for Future Tokens (SAFT) or a straight Token Purchase Agreement (TPA) which are both considered investment contracts as a result.
This also means the legals can be delayed until tokens effectively get distributed, allowing project sponsors to gauge immediate interest from their community and buying themselves time to figure out what regs may apply.
The end result is flash funding without legal or regulatory anxieties.
In the next sections, we describe in detail how to start a launchpool.
1. Access OtoCO dash
First, connect your Ethereum wallet you used to spin up an entity with OtoCo and simply go to your organization dash. Select OtoGO from the menu to the left.
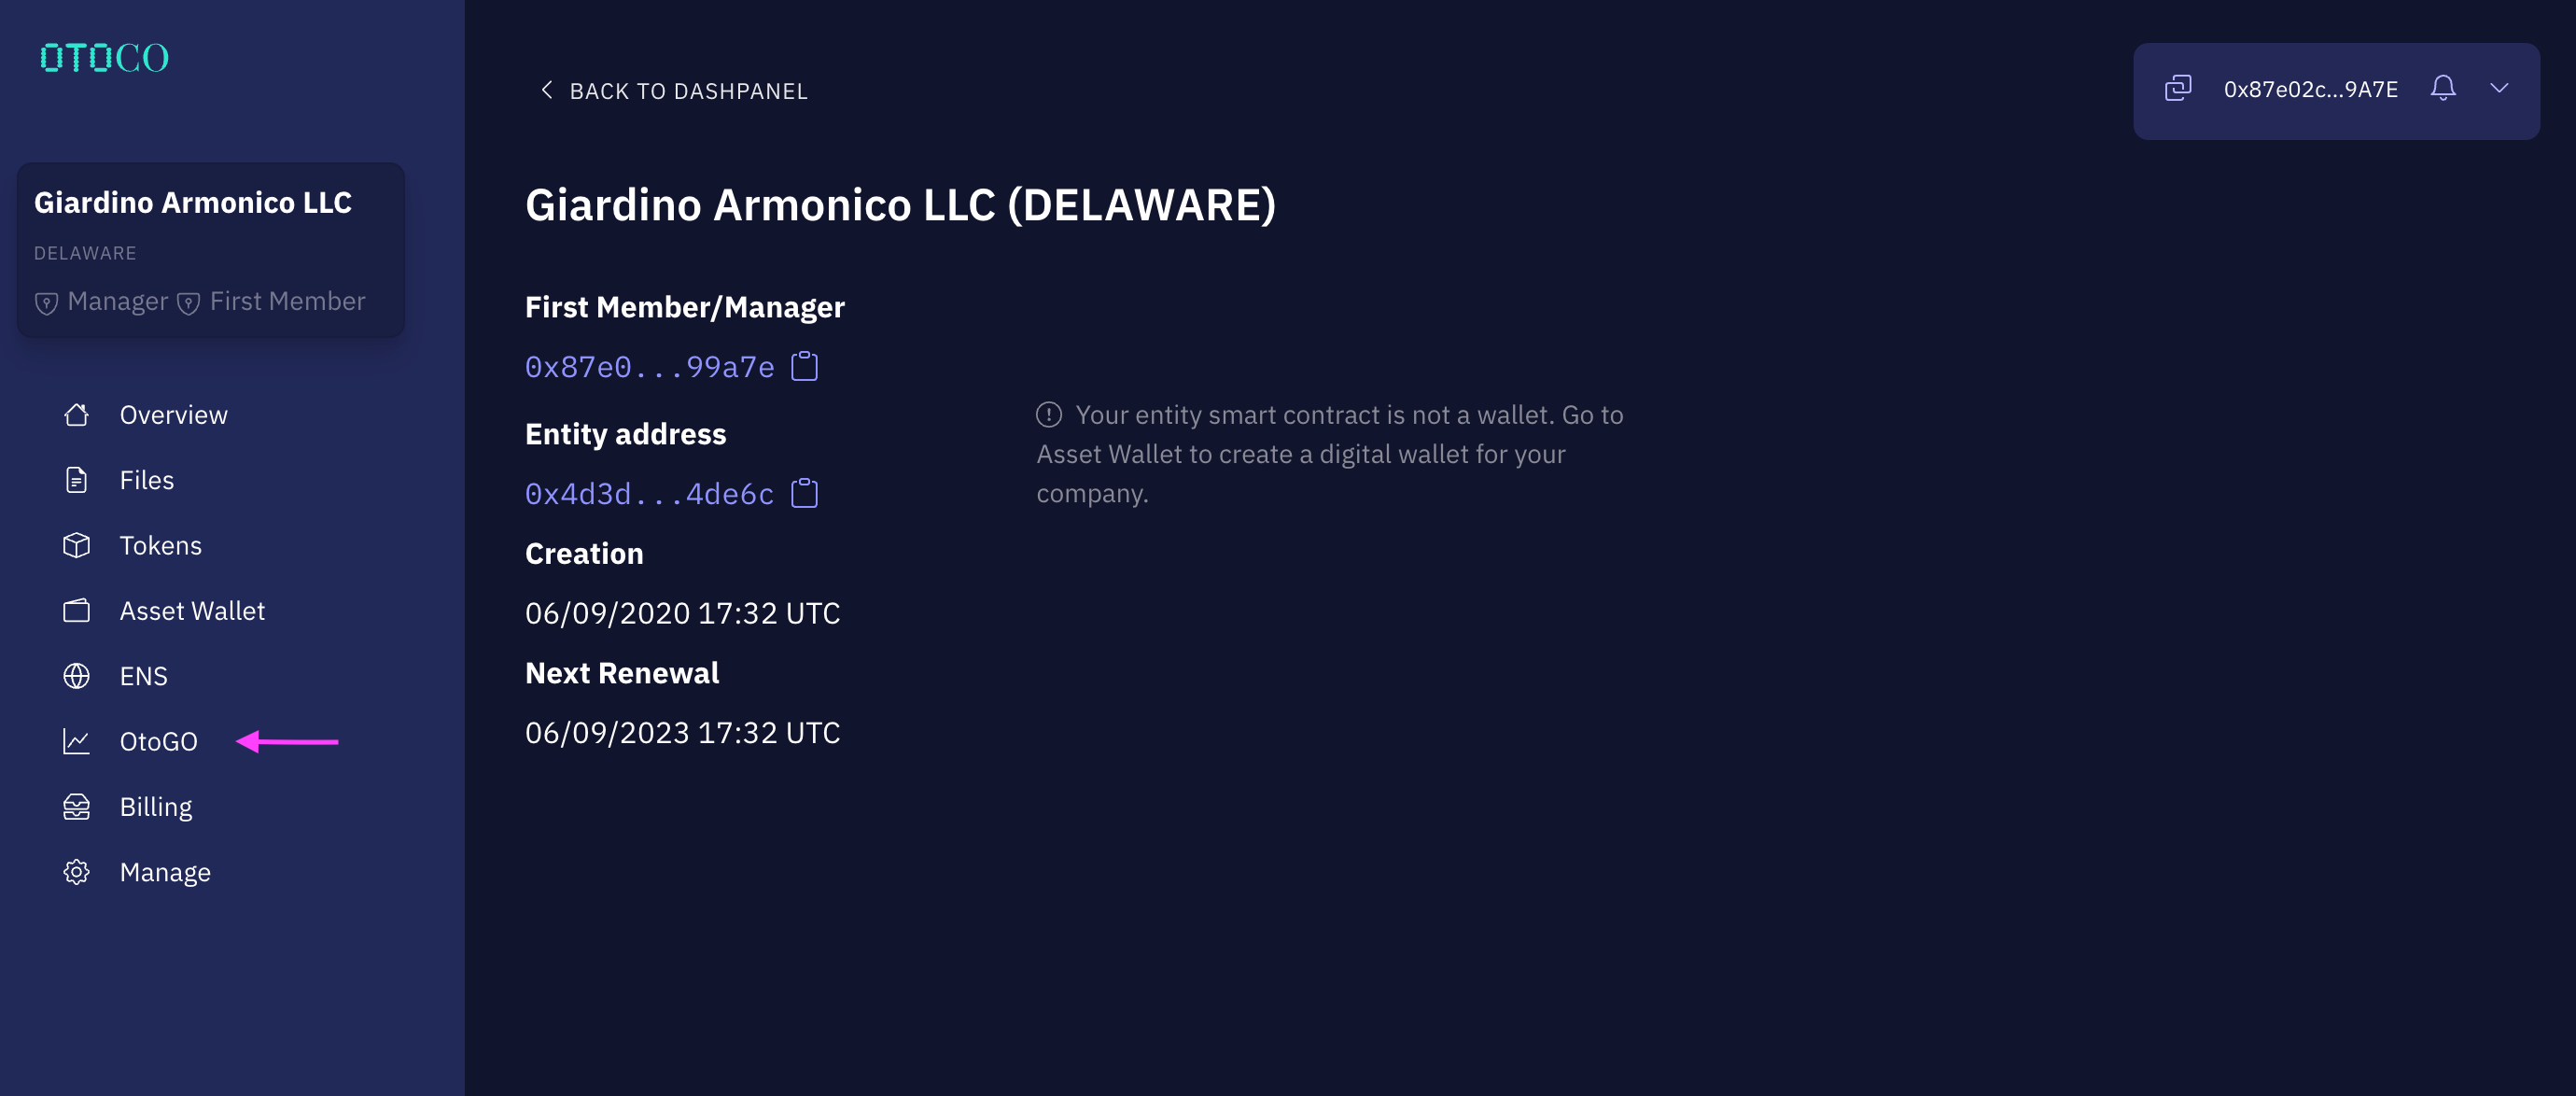
In the example above, the launchpool is organized by an existing onchain Delaware LLC as Sponsor but you can also use an unincorporated DAO spawned by OtoCo’s onchain entity assembler.
2. Parameter your launch pool
In a next screen, you can parameter your launch pool:
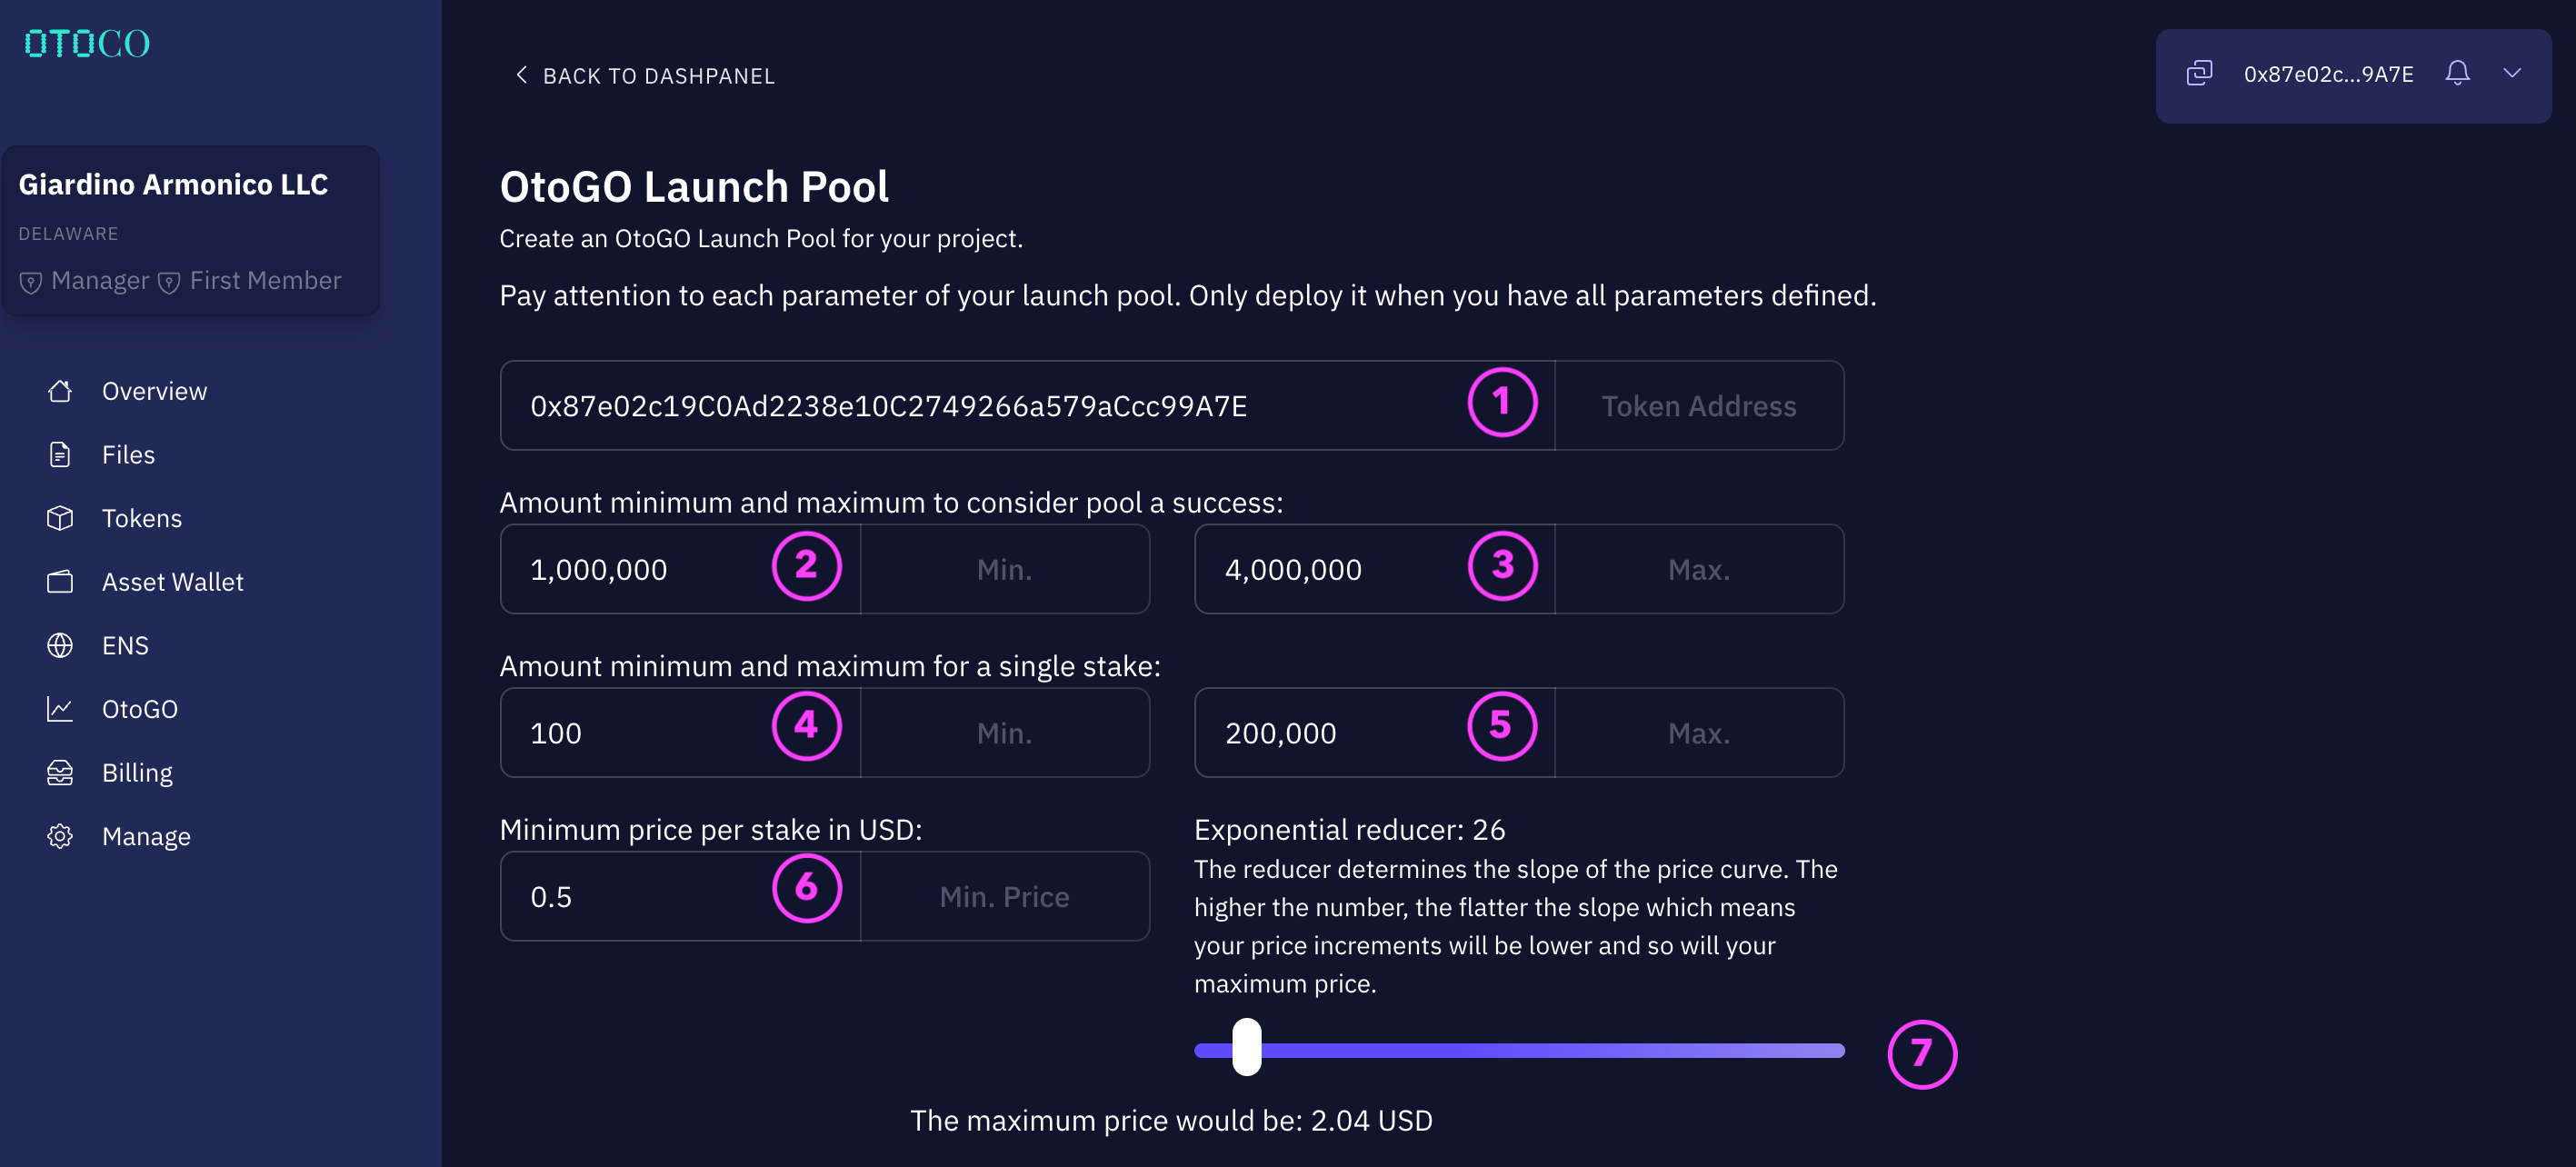
① Paste your token smart contract address
If you used the token foundry within OtoCo to create your ERC20 token, simply paste the smart contract address shown in the Token section of your dashpanel.
If you created your token outside OtoCo, just paste your token smart contract address.
② Set the soft cap
This soft cap needs to be reached before the lock function is called (see below).
③ Set the hard cap
When this hard cap is reached, staking closes. Unstaking is still possible until the lock function is called.
④ Minimum amount per stake
Enter the minimum amount required to validly stake. A low minimum will make it easier for more people to pre-order your token.
⑤ Maximum amount per stake
Enter the maximum amount that can be staked per wallet.
⑥ Minimum price per stake in USD
This is the starting price at which your token can be reserved. It is denominated in USD for ease of reference, since only stablecoin can be used to stake (see below).
> Tip: Simply divide your hardcap by the minimum token price to know how many tokens could maximally be reserved.
E.g. with a hard cap of USD 4MM and a minimum token price of USD 0.5, a maximum of 8MM token can be reserved. However since nobody is allowed to stake the full 4MM (in our example the maximum per staker is USD 200k), less than 8MM tokens will have been pre-sold when the hard cap is reached.
⑦ Set the reducer
You can move the slider left or right to see the impact on your maximum token price using a lower (left) or higher (right) reducer.
In the example above, with the minimum price per token set at USD 0.5 and the reducer set to 26, the price will gradually increase along a sloping curve to a maximum of USD 2.04 per token as the pool fills.
The reducer essentially determines the slope of the pricing curve. Your final price will be calculated depending on your final place in the queue when the Calculate function is triggered (see below).
Note that, as with a real-world queue, if anybody who joined ahead of you were to leave the queue by unstaking, your price will improve. However, your price can never move against you.
⑧ Select what digital assets can be staked
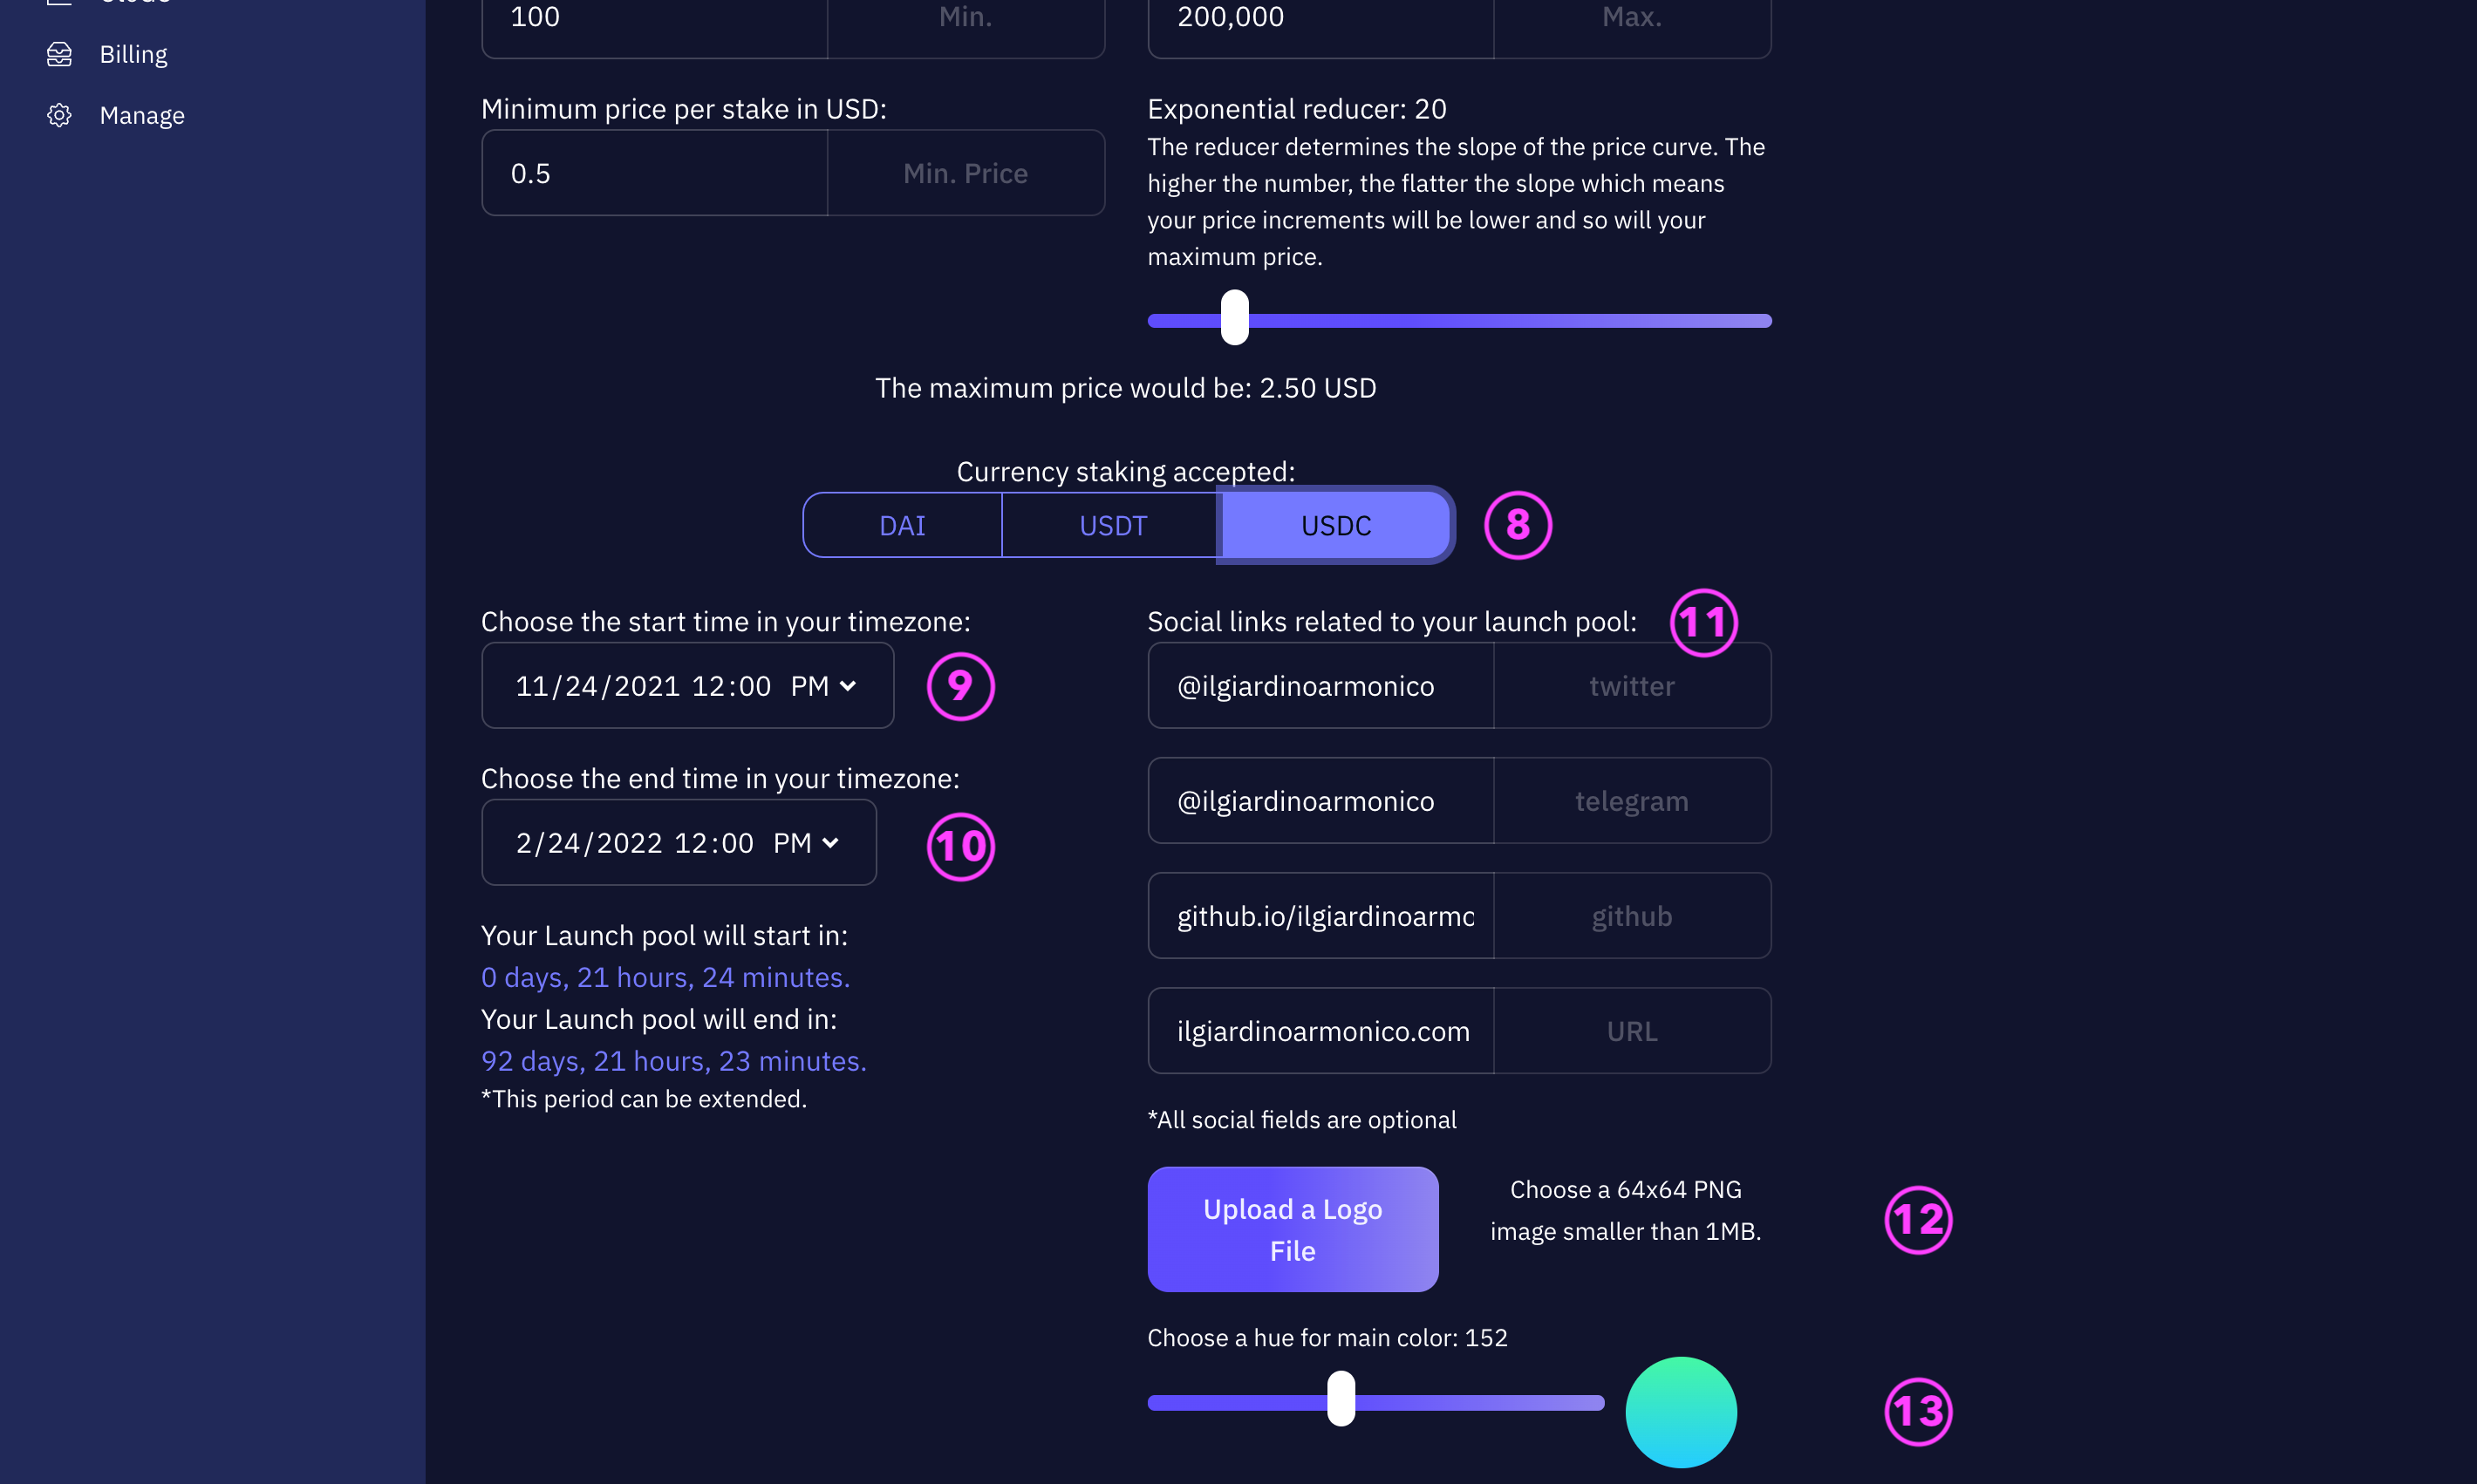
In principle this can be any ERC20 token. However we currently limited the stakable assets to stablecoins to do away with exchange rate complications, as the launchpool itself is denominated in USD.
We also figured that people who would want to stake say ETH may as well collateralize ETH and withdraw DAI via e.g. MakerDAO’s Oasis dApp.
Note that staking any different tokens than those allowed by the launch pool will be rejected.
⑨ Choose the start date for your launchpool
This is the date and time in your timezone when your launchpool will initiate. Initiation will be automatic without the need to call any function provided your launchpool was properly parametered.
①⓪ Choose the end date for your launchpool
This is the date and time in your timezone your launchpool will close.
There are 3 possible outcomes at this time:
- The soft cap was not reached: the funds cannot be locked by the project sponsor and everybody can unstake.
- The soft cap was reached but the project sponsor decides to let the launchpool run by not collecting the funds. Everybody can still stake up to the hard cap, but nobody can unstake.
- The project sponsor can extend, irrespective of the amount on the clock, and everybody can still stake and unstake.
①① Social links
Here you can enter the links to your major social media, which will then appear as buttons on your launchpool site.
①② Upload your logo file
Make sure it is the right size and transparency. It will appear prominently on your launchpool Web3 page.
①③ Select a color scheme
We had a bit of fund with this feature :-). You can slide across the color spectrum and we then pair your chosen color with a second color to get to a matching gradient for your launchpool page.
See how your launchpool site will look like by clicking “Preview OtoGO.”
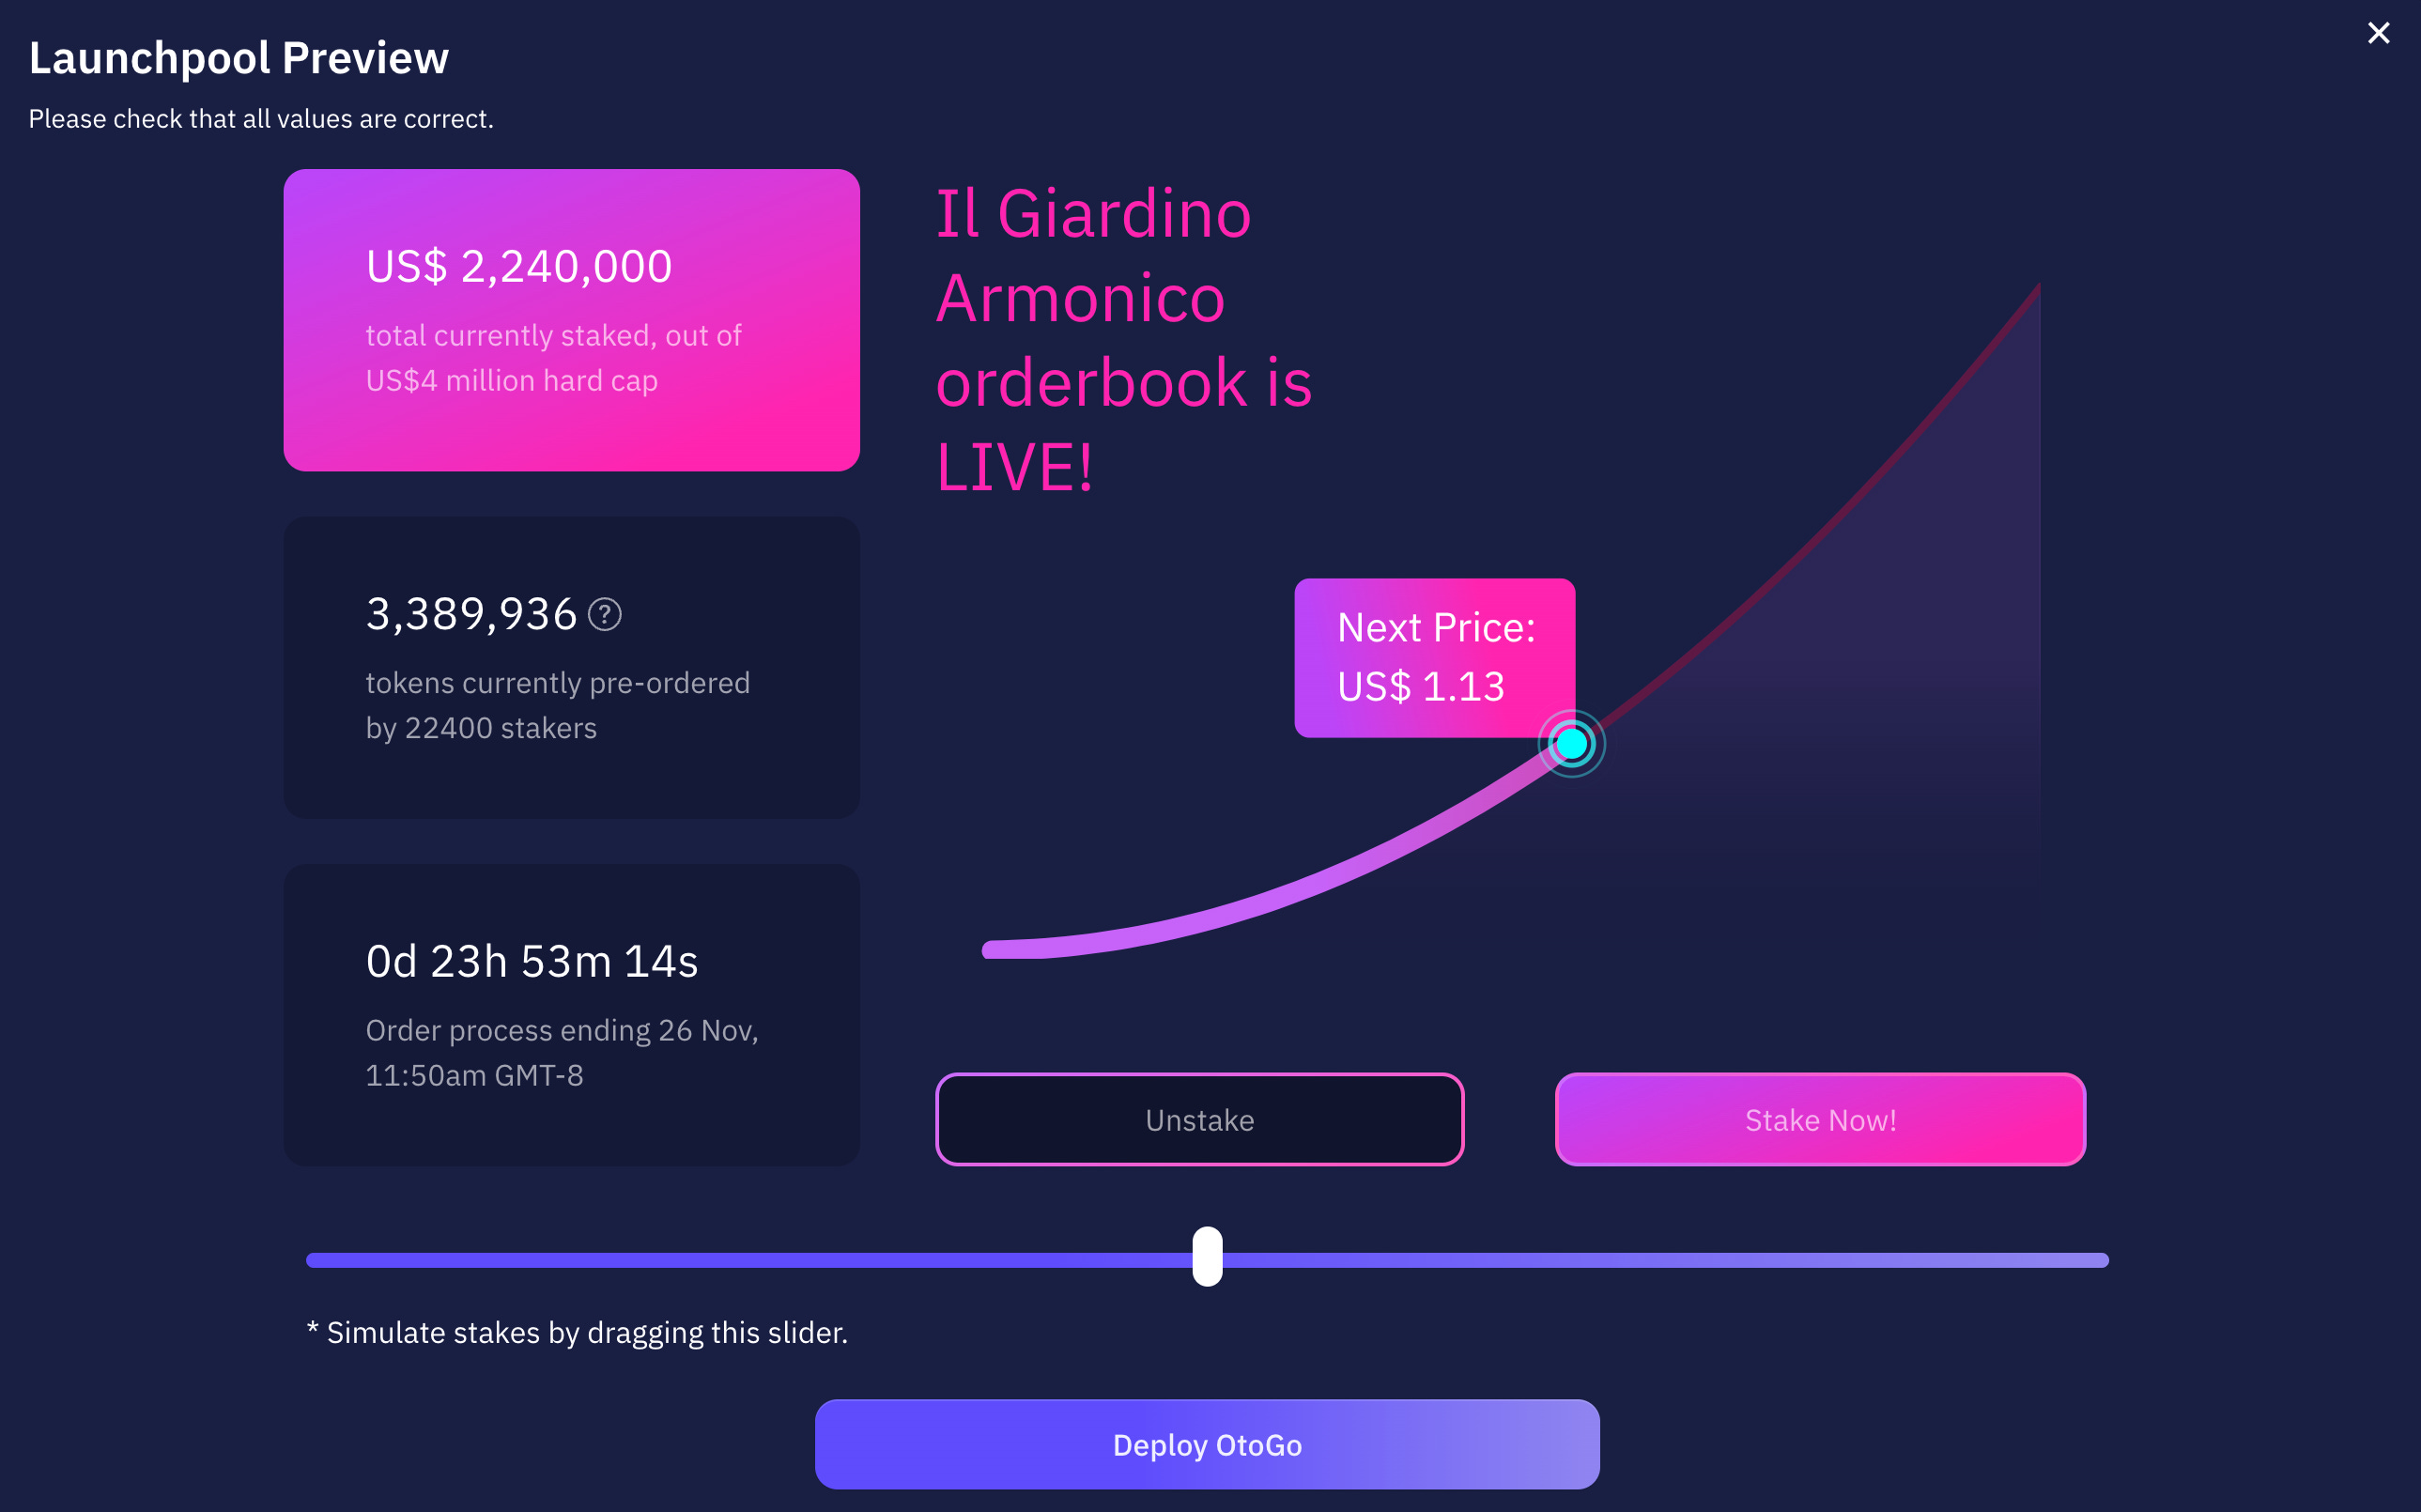
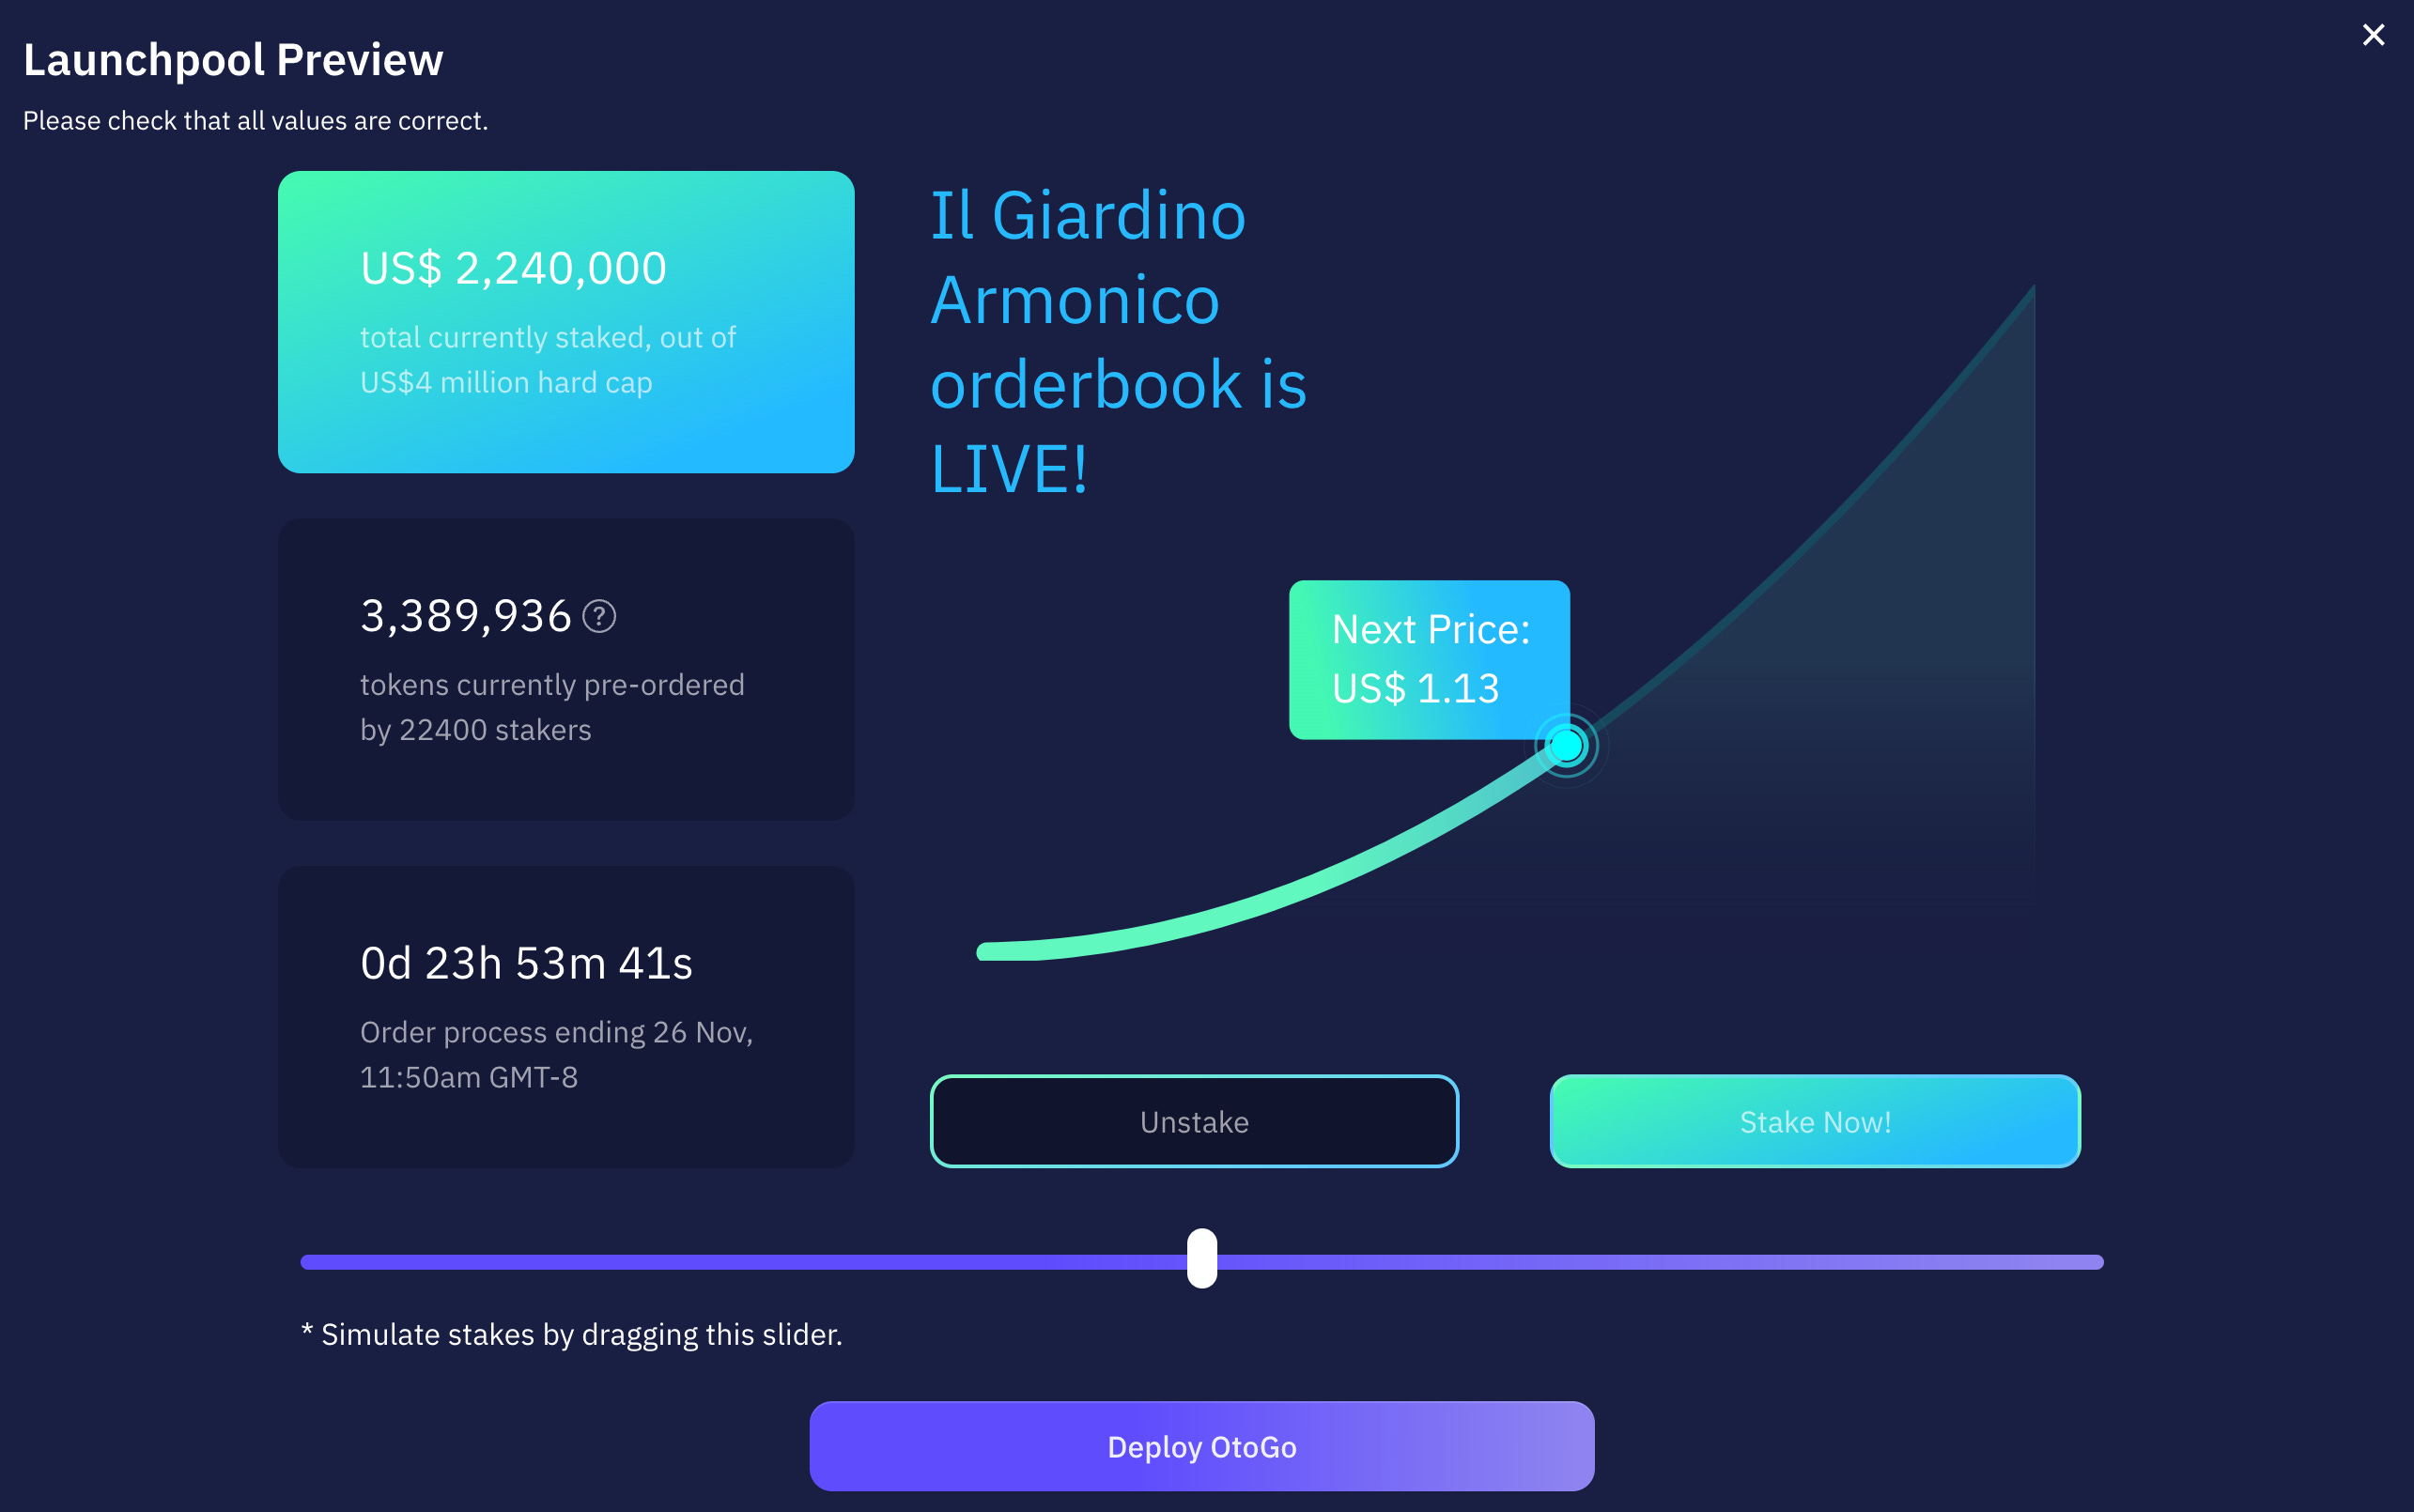
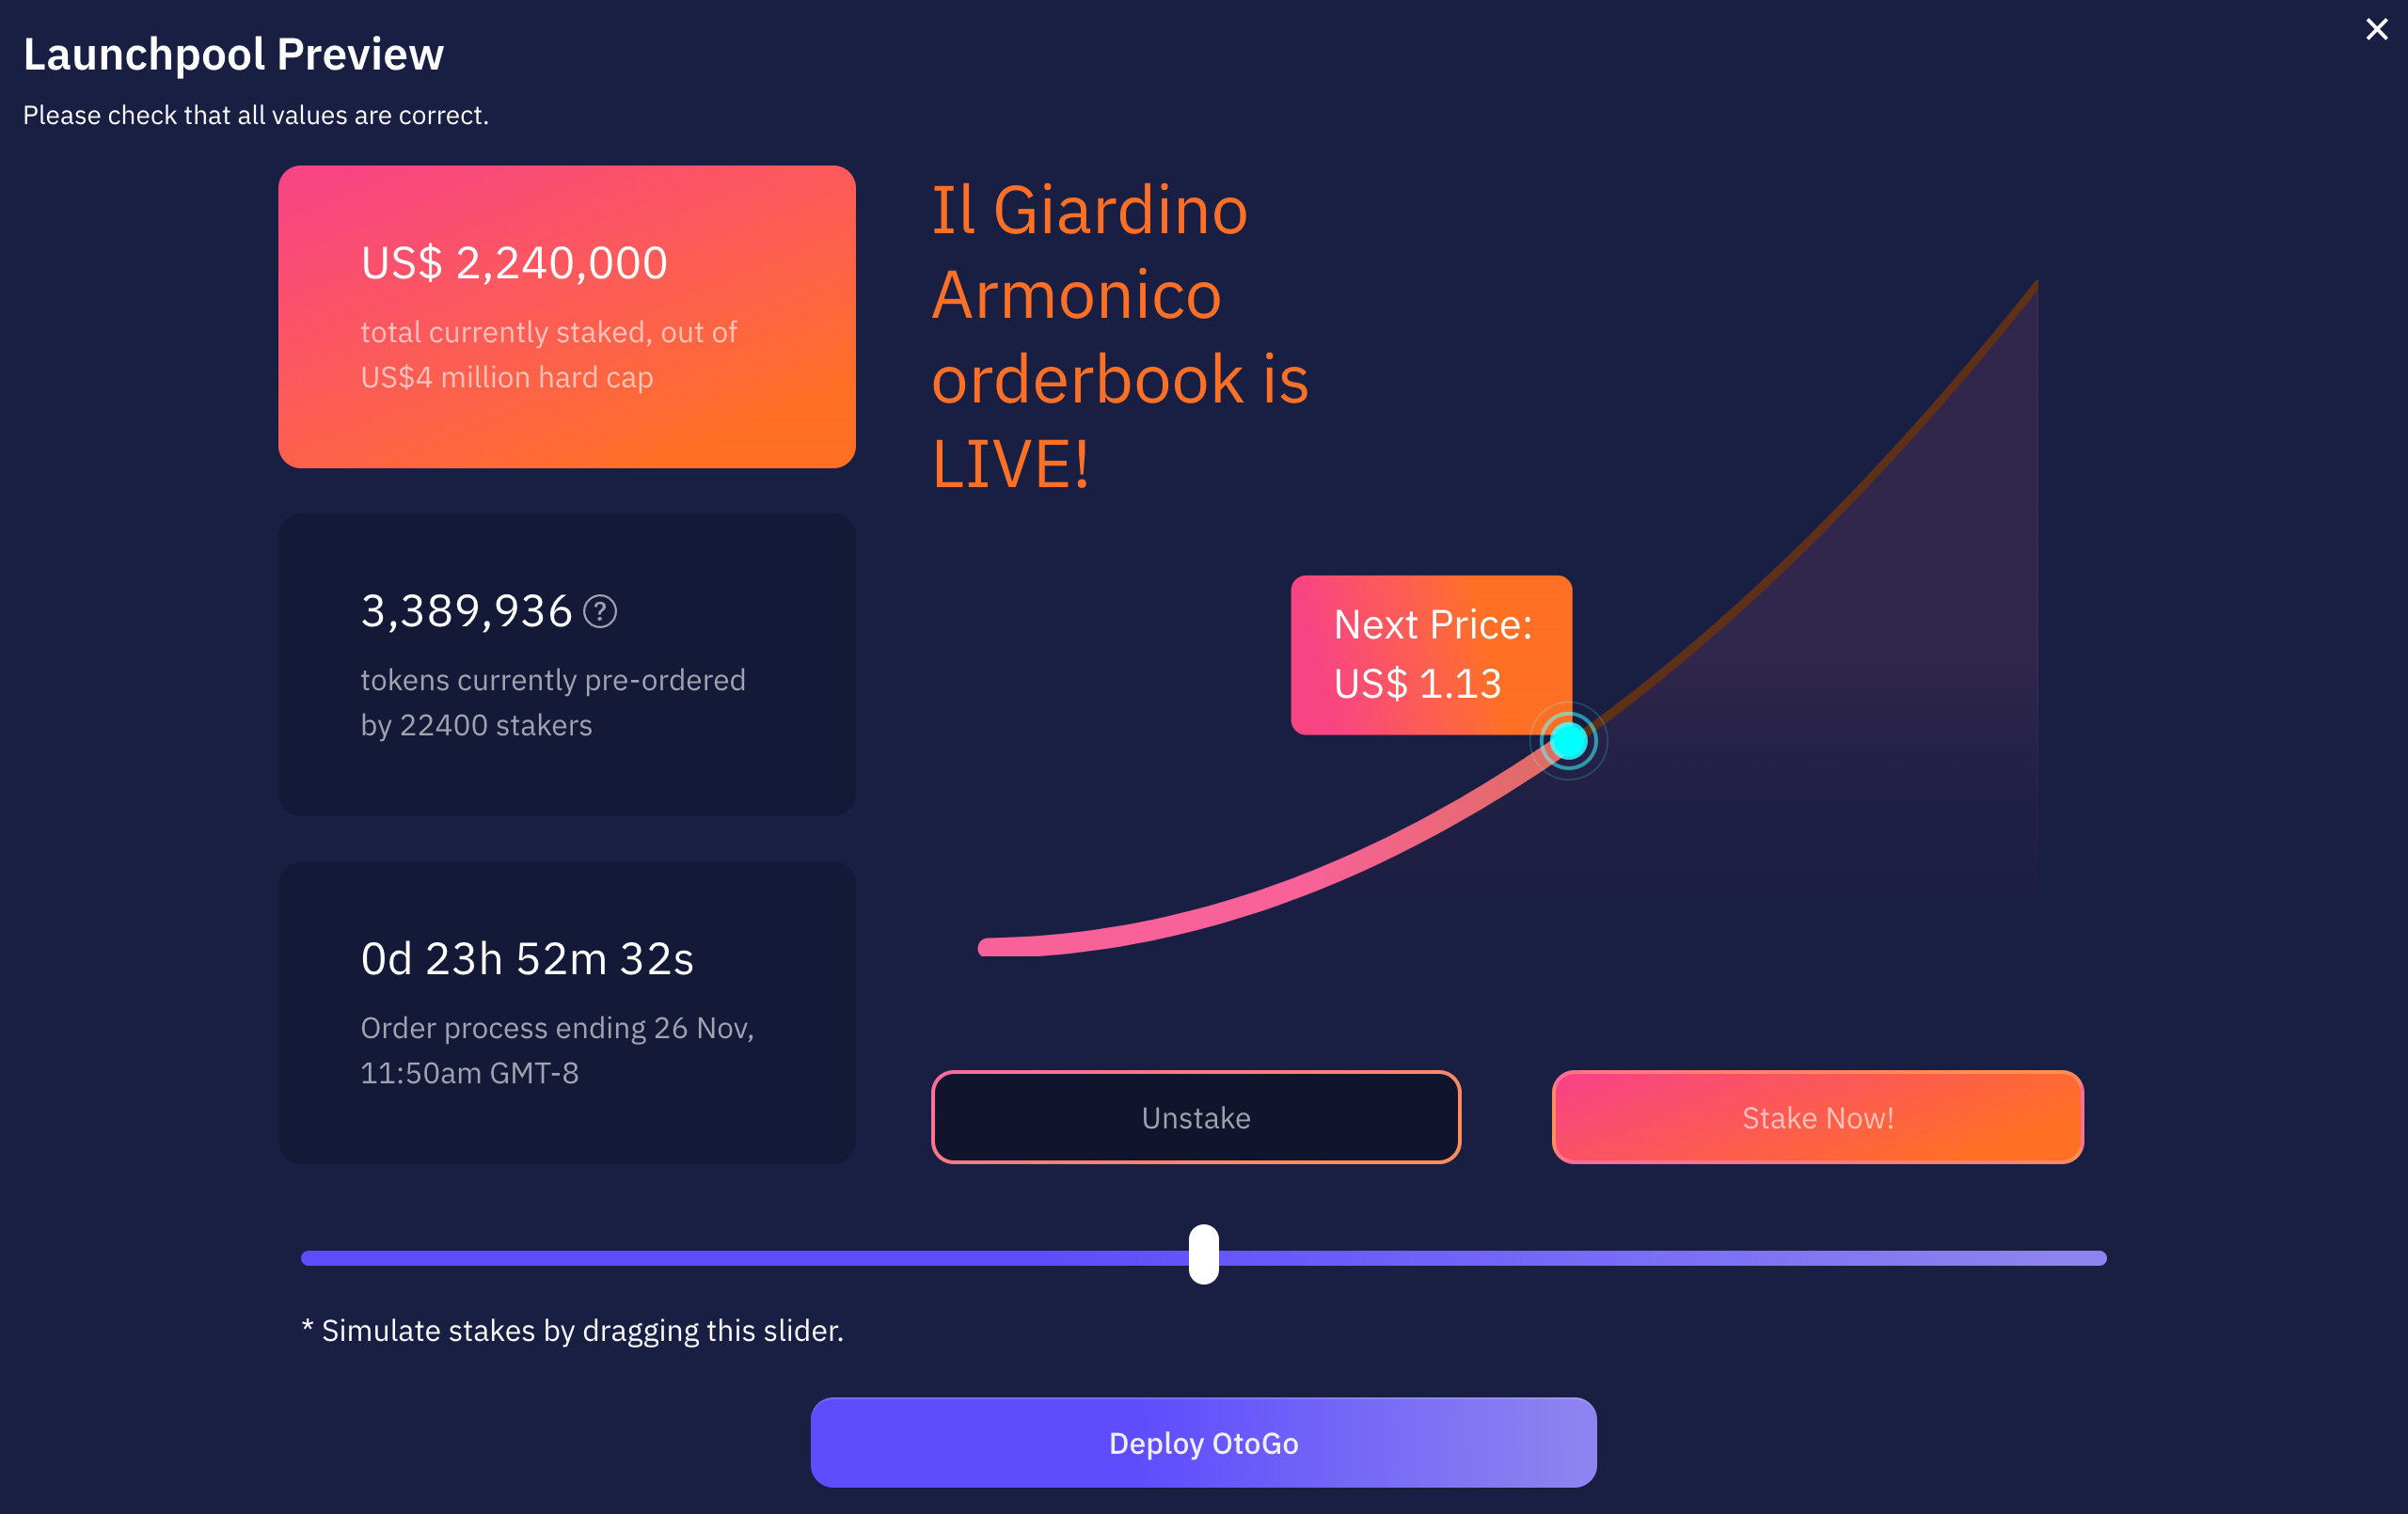
> Tip: You can use the slider on the Preview page to get a sense of how the price moves in function of the number of stakers that reserve your token.
3. Ready to deploy
When you’re happy with your parameters and how this all looks, click “Deploy”.
This commences your launchpool’s initialization sequence.
You will first need to make a payment to interact with the OtoGO smart contract:
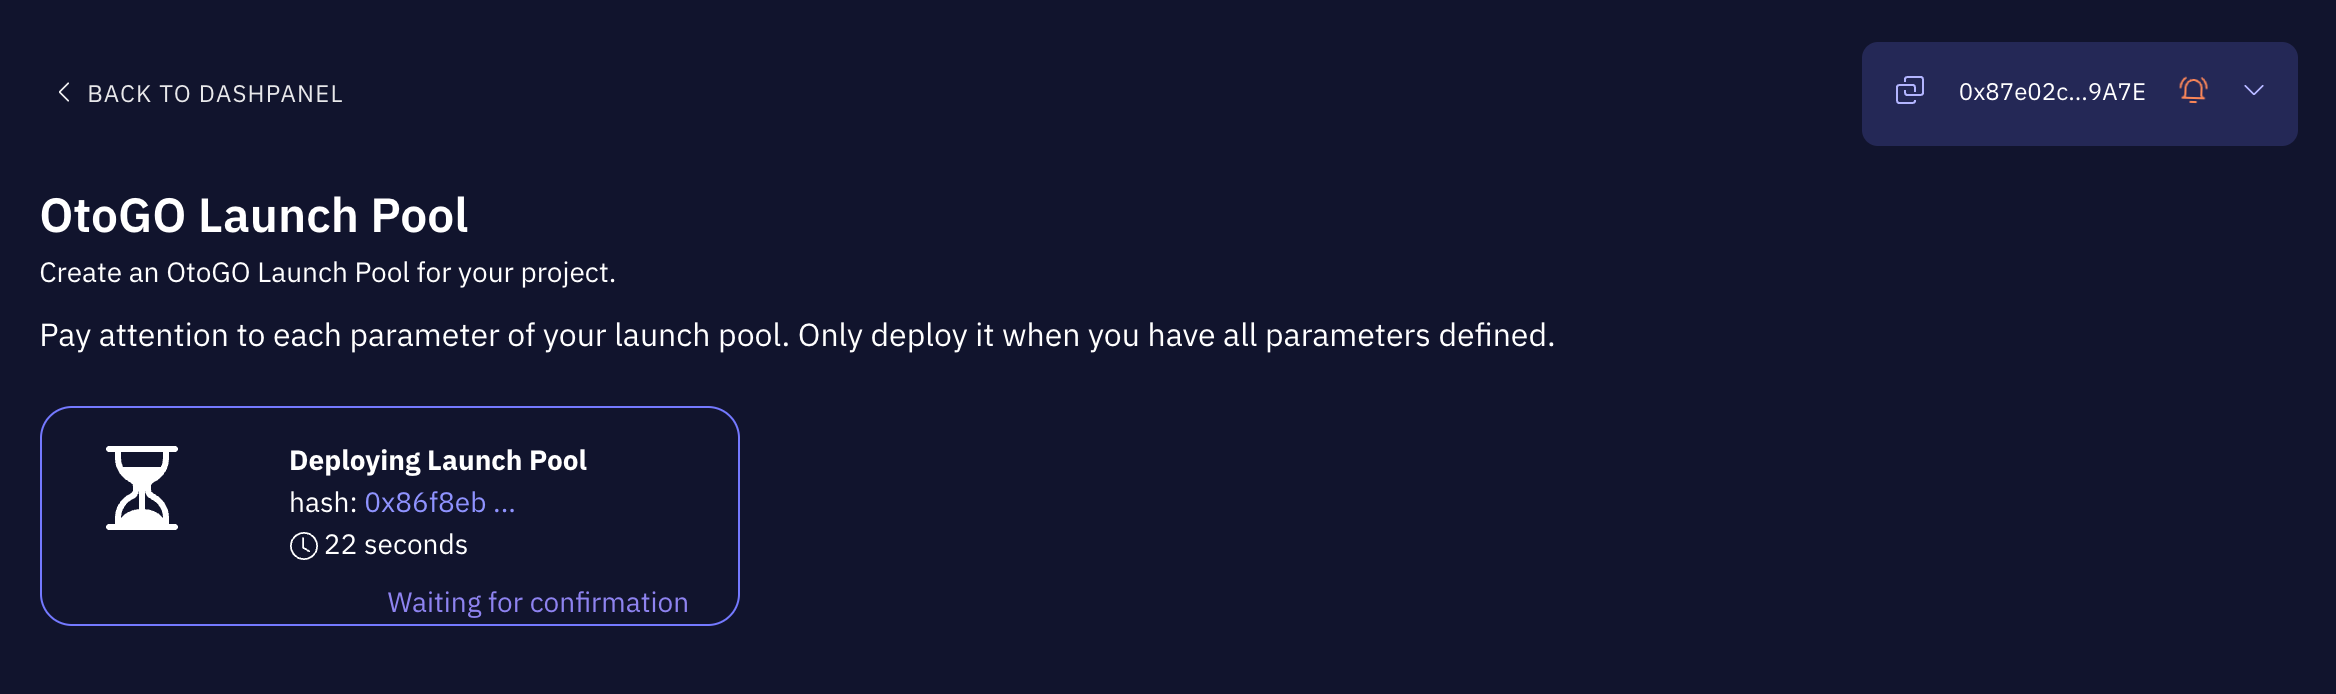
You can calibrate the gas fees using MetaMask. Make sure you have some ETH in the wallet you connected with. The deployment could take over a minute.
Once the above transaction confirms, you will be able to manage your launchpool’s lifecycle.
A Current Status screen gives you an overview of your launchpool status:
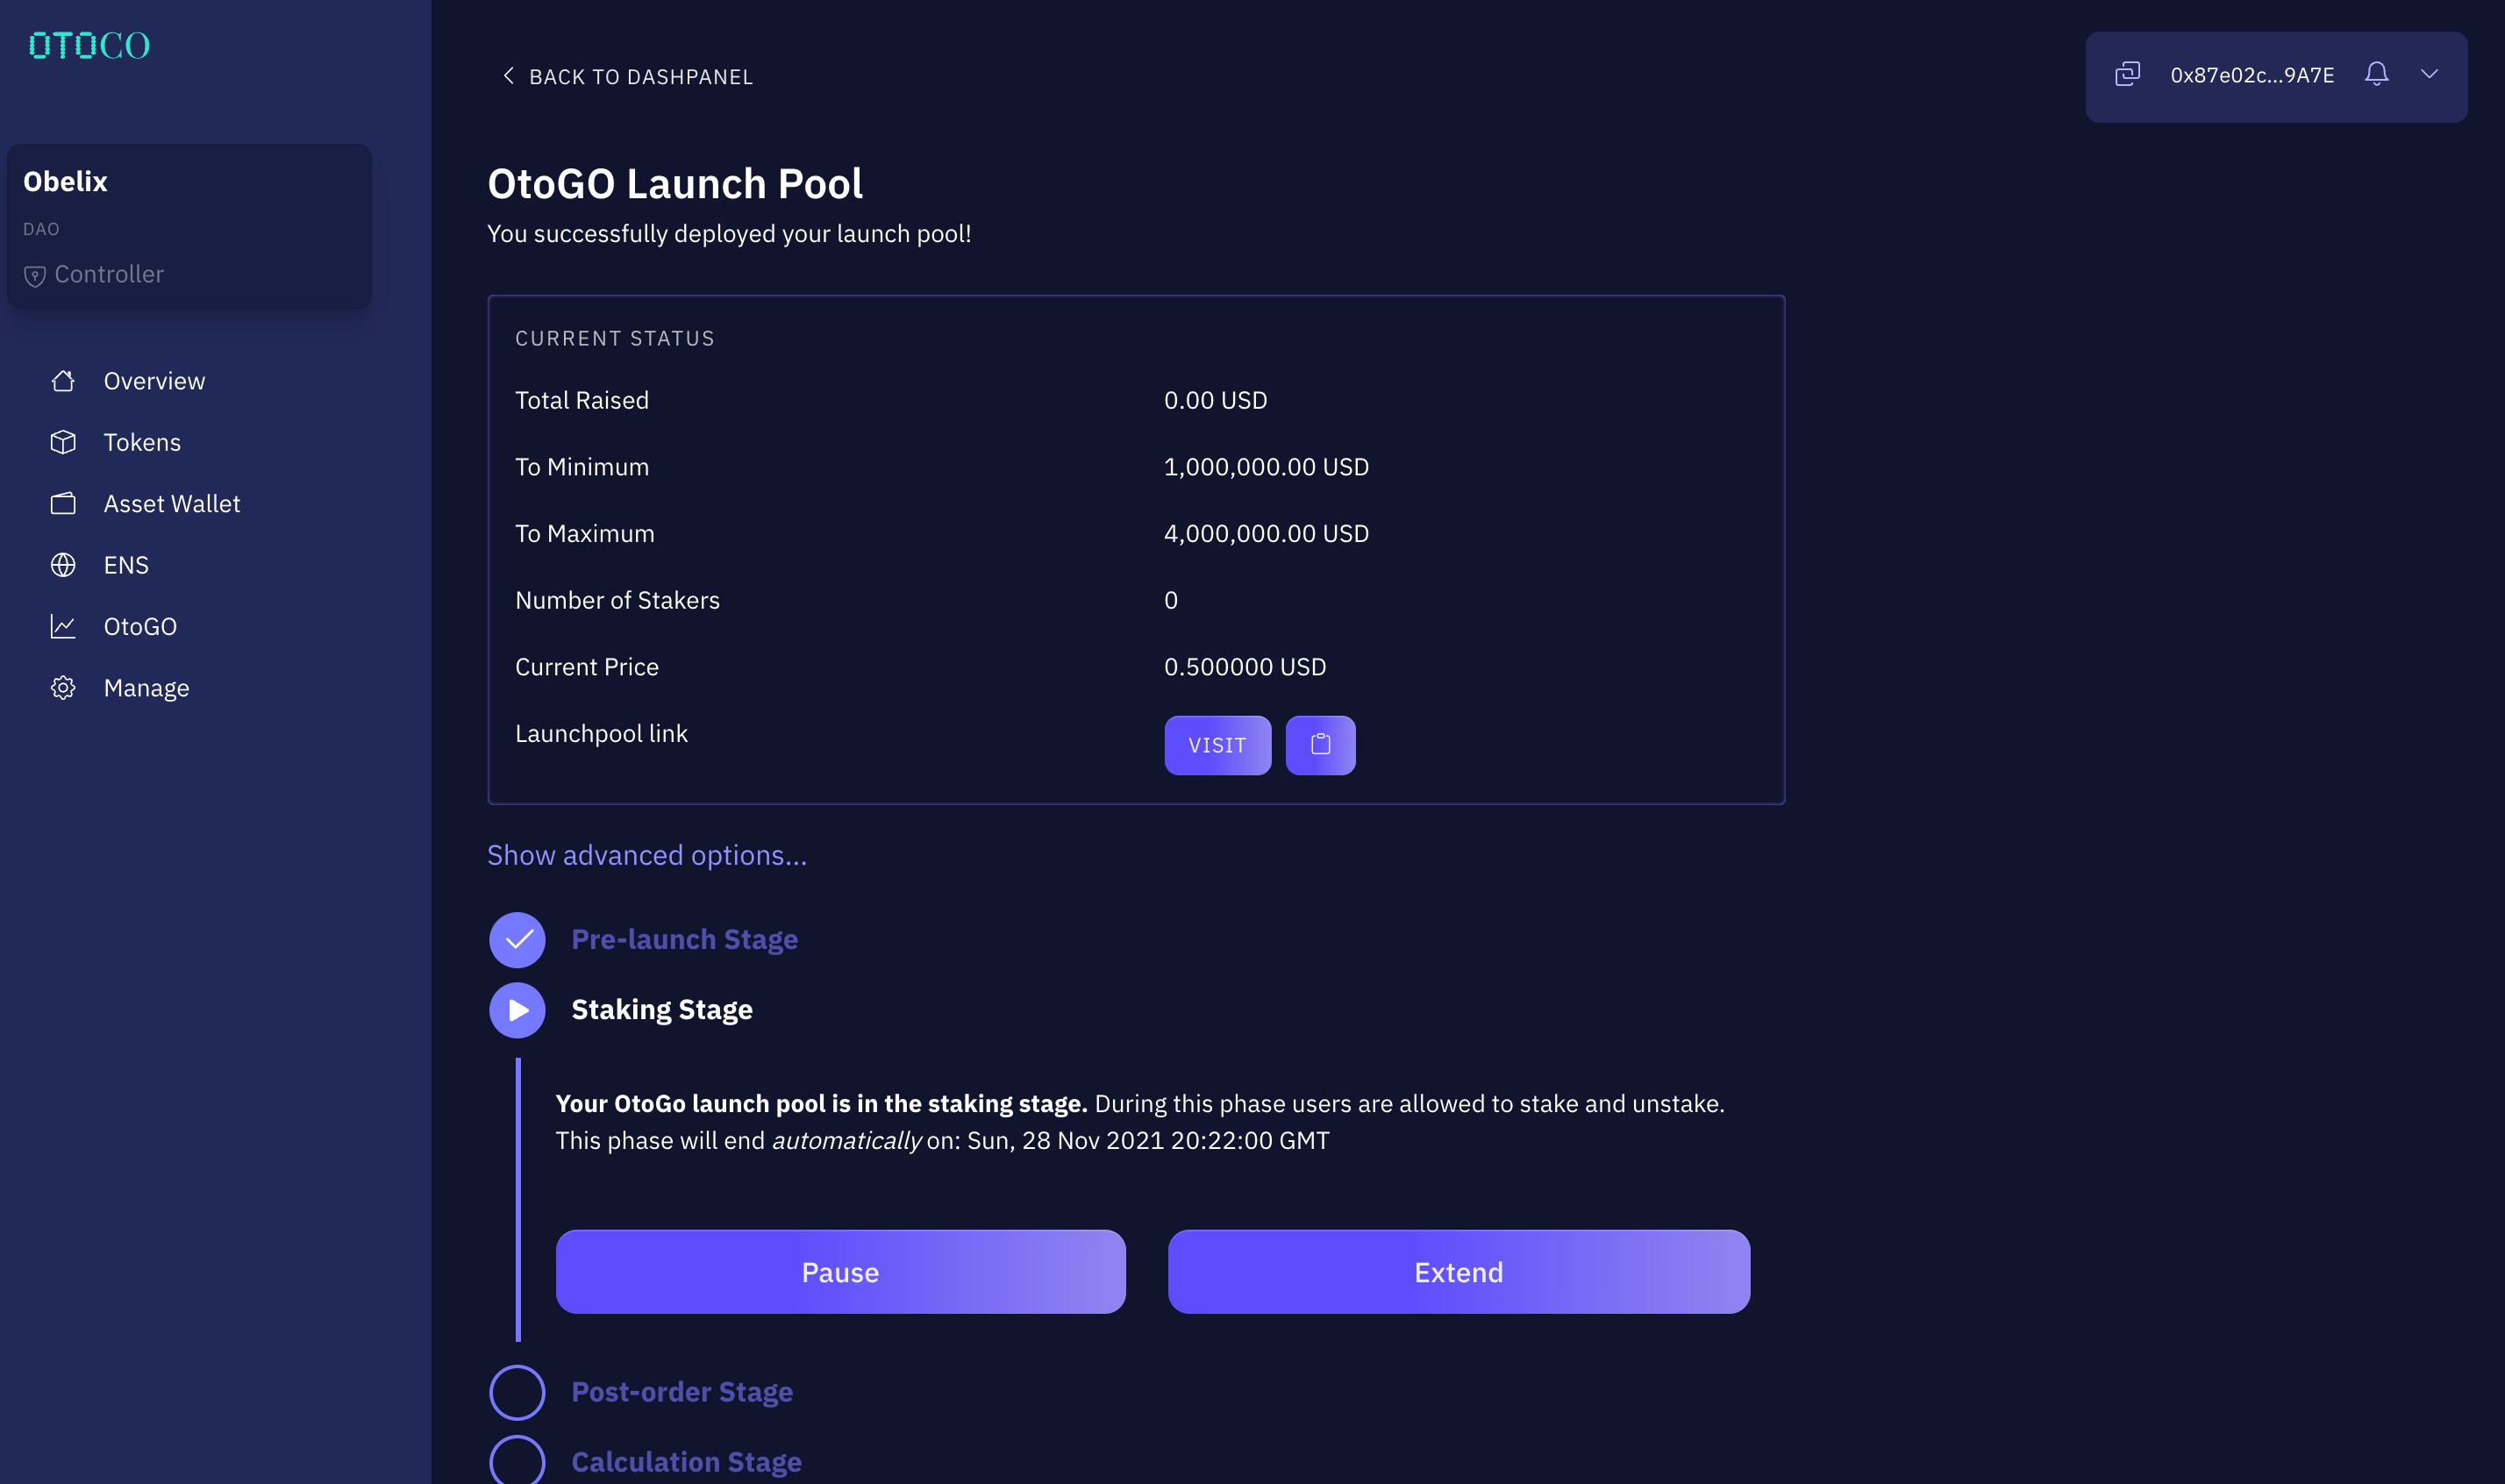
In your status overview, you will also find a link to your launchpool Web3 site, with the logo and color scheme you selected, which you can copy and share with your community:
4. Stages in life
You can now manage your launchpool’s entire lifecycle from the same dash:
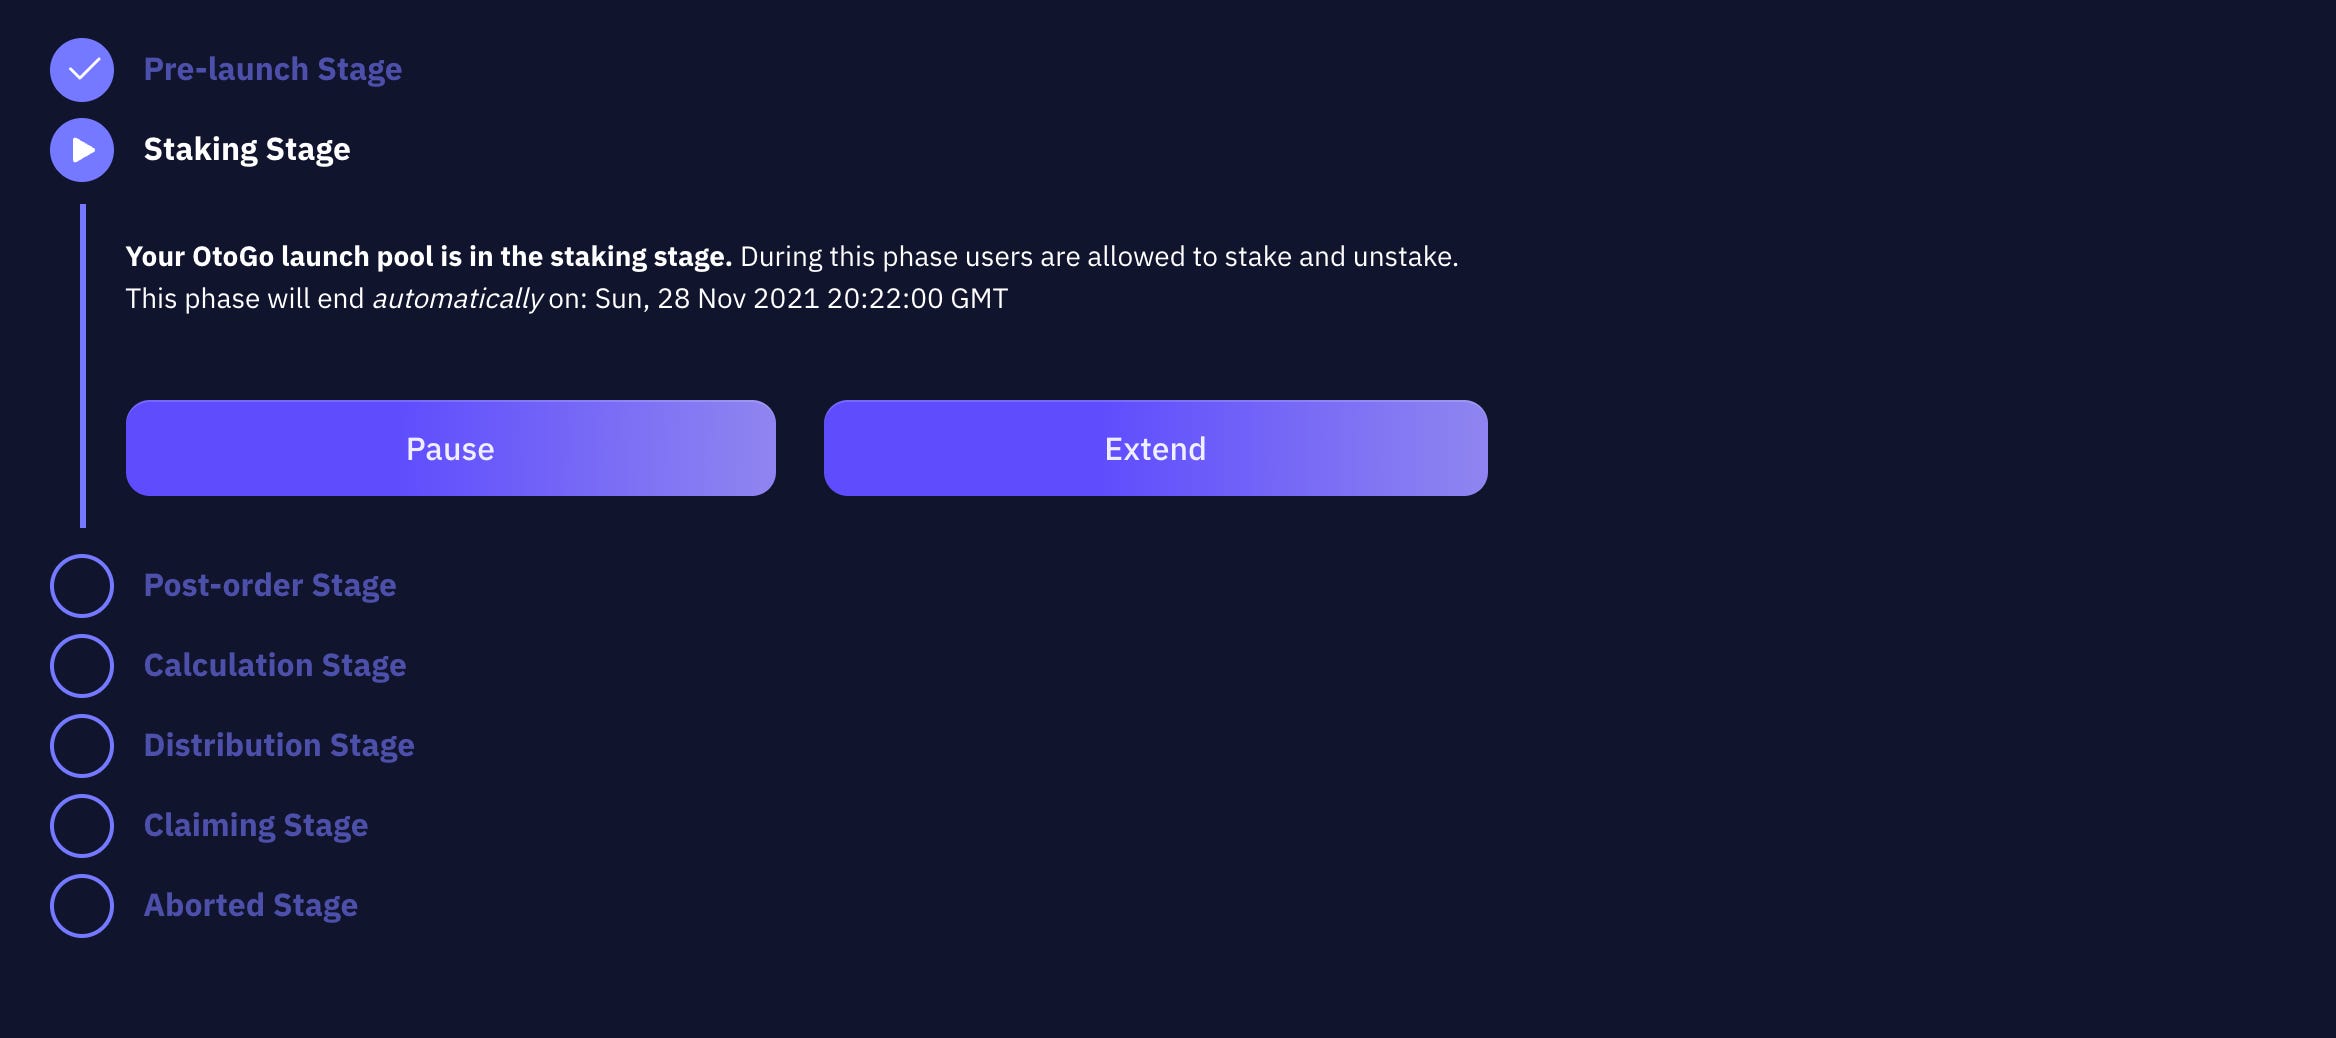
Pre-launch stage
This is the stage after the launchpool was initialized but before the start date (see ⑨ above).
Staking Stage
This is the live stage during which anybody can stake and unstake. It will end at the date and time you defined when setting the parameters of your launchpool. You can
pauseandunpauseyour Staking Stage at any time. Nobody can stake when your launchpool is paused but people can still unstake. If the hardcap is not reached, the project sponsor can choose toextendthe launchpool by a chosen number of days. Staking and unstaking then continues during the extension. Note that theextendfunction has to be called before the end date.Post-order Stage
When the end date is reached, and provided the soft cap has been reached, the Sponsor can call thelockfunction. Once called, nobody can stake or unstake anymore. If not called, staking can continue up to the hard cap but nobody can unstake.Calculation Stage
The
lockfunction then triggers the Calculation Stage which makes a final tally of all stakers and calculates how many tokens each staker will receive for the amount they staked.1Distribution Stage
Once all tokens are calculated, the contract automatically triggers the Distribution Stage. Sponsor willapprovethe tokens for transfer to the stakers and there is no need to manually transfer any tokens. All Sponsor has to do is triggerdistributeSharesChunkon the smart contract, which transfers all calculated tokens to the respective staker.2Claiming Stage
Once the last tokens are distributed, the Claiming Stage is automatically triggered. At this stage, Sponsor can call the
withdrawStakesfunction, which allows Sponsor to withdraw all amounts staked. Only at this stage are the funds available to Sponsor and are they legally committed.Abort
Sponsor can always abort the sequence after the end date. This will allow all Stakers to unstake.
5. What About the Regs?
Our terms reflect clearly that as a software development company building permissionless tools, OtoCo has no role in determining the laws and regulations that may apply to the token users create and sell for their project.
With this in mind, OtoCo makes no warranty as to the merit, legality or juridical nature of the token distributed via its OtoGO launchpool product, including whether it is considered a security or financial instrument under any applicable securities laws.
Since tokens are only reserved but not sold during the Staking Stage, Sponsor will have up to the Distribution Stage to determine the laws and regulations that may apply and the need - if any - to require KYC/AML of the token recipients.
If the token has no characteristics of a security, it can arguably be freely distributed to anybody who staked, however Sponsor may still want to add geofencing and/or other compliance filters to reduce the regulatory risk.
If the token does have the characteristics of a security, its distribution will need to be channeled within applicable securities laws, and Sponsor would need to whitelist the token recipients.
OtoCo may eventually provide such whitelisting tools and may upgrade its token foundry e.g. to allow for the creation of tokens that have lockups or transfer restrictions, however it would still be the sole responsibility of users to determine how and what regs apply.
GO for a spin
You can test-drive OtoGO by opening otoco.io in a Web3 browser and connecting to the Ethereum Ropsten test network using MetaMask.
If you do not already have an onchain entity, you will need to first create an LLC or a DAO that can act as the Sponsor of your first launchpool. You can create such entity for test purposes on Ropsten too.
You will need some ETH on Ropsten and some Ropsten DAI if you want to see how staking works.
Share your experience with OtoGO with the wider OtoCo community and post what you’d like to see in a next version via our official OtoCo Telegram channel.
Technically, the token allocation is calculated as long as
gasLeft> 100000 per transaction. OncegasLeftfalls below 100000, the contract stops its calculation on the current index, and the function needs to be called again. This process is then repeated until the tokens are calculated for each staker. ↩The process is identical to the
calculateSharesChunkabove: tokens are distributed as long asgasLeft> 100000 per transaction. WhengasLeftfalls below 100000, the contract stops distributing on the current index, and the function needs to be called again. This process is repeated until all stakers receive their respective tokens. ↩